Difference between revisions of "Copy"
(Created page with "'''Bend-Tech 7x Wiki :: Assembly :: Edit :: Copy''' __NOTOC__ right <h3>Copy Single Part</h3> Click the '''Select...") |
|||
| Line 2: | Line 2: | ||
__NOTOC__ | __NOTOC__ | ||
[[File:edit_copy.png|right]] | [[File:edit_copy.png|right]] | ||
| + | |||
| + | |||
| + | |||
<h3>Copy Single Part</h3> | <h3>Copy Single Part</h3> | ||
| − | Click the '''Select Part''' button [[]] to copy and paste a single part to a new location. | + | Click the '''Select Part''' button [[File:select_part.png]] to copy and paste a single part to a new location. |
| + | |||
| + | First, select the part that will be copied. Next, choose a PickPoint to be the anchor point for the part. This point will be used as the "handle" to drag it to the new location. Last, click on the new location point to place the part. | ||
| + | |||
| + | |||
| + | [[File:edit_copy_1.png|650px]] | ||
| + | |||
| + | |||
| + | |||
| + | |||
| + | |||
| + | |||
| − | |||
| Line 16: | Line 29: | ||
Use the '''Copy Multiple Parts''' tools to copy and paste a specified group of parts or points to a new location. | Use the '''Copy Multiple Parts''' tools to copy and paste a specified group of parts or points to a new location. | ||
| − | First, click the '''Set Base Point''' button [[File:set_base.png]] to define the anchor point of the part/point group. This will used | + | First, click the '''Set Base Point''' button [[File:set_base.png]] to define the anchor point of the part/point group. This will be used as the point to attach the group to the new location point. |
| + | |||
| + | Next, select the points or parts that will be copied by clicking on them. Once selected, a part/point will be highlighted in red. Be sure to specify which kind of features will be copied by choosing the '''Parts''' or '''PickPoints''' option. Click the '''Clear All''' button to clear all selections. Click the '''Select All''' button to select all of parts or points currently in the assembly design. Click the '''Complete''' button [[File:complete.png]] to indicate that all the desired parts have been selected. | ||
| + | |||
| + | Last, click the '''Paste Parts''' button [[File:paste_parts.png]] and select the new location point to place the parts. | ||
| + | |||
| − | + | [[File:edit_copy_2.png|1000px]] | |
Latest revision as of 09:55, 9 June 2014
Bend-Tech 7x Wiki :: Assembly :: Edit :: Copy
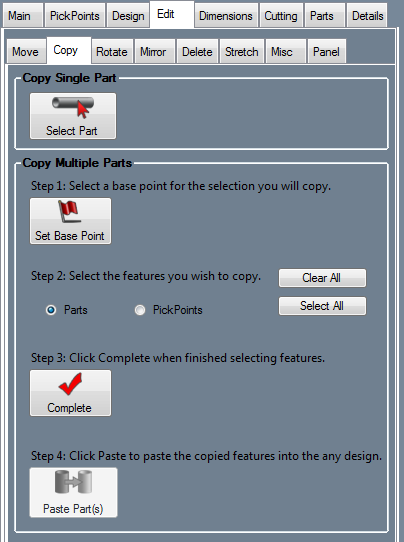
Copy Single Part
Click the Select Part button ![]() to copy and paste a single part to a new location.
to copy and paste a single part to a new location.
First, select the part that will be copied. Next, choose a PickPoint to be the anchor point for the part. This point will be used as the "handle" to drag it to the new location. Last, click on the new location point to place the part.
Copy Multiple Parts
Use the Copy Multiple Parts tools to copy and paste a specified group of parts or points to a new location.
First, click the Set Base Point button ![]() to define the anchor point of the part/point group. This will be used as the point to attach the group to the new location point.
to define the anchor point of the part/point group. This will be used as the point to attach the group to the new location point.
Next, select the points or parts that will be copied by clicking on them. Once selected, a part/point will be highlighted in red. Be sure to specify which kind of features will be copied by choosing the Parts or PickPoints option. Click the Clear All button to clear all selections. Click the Select All button to select all of parts or points currently in the assembly design. Click the Complete button ![]() to indicate that all the desired parts have been selected.
to indicate that all the desired parts have been selected.
Last, click the Paste Parts button  and select the new location point to place the parts.


