Tube to Assembly Transfer
Contents
Transfer Interface
When transferring a single part from any tube designer to the Assembly designer, the user can refer to this guide for assistance.
The Transfer Menu
When transferring a part to Assembly, select the part from the display area, or from the part list and select the "Transfer Drop Down Menu" ![]() at the top of the screen on the "Icon Menu Bar".
at the top of the screen on the "Icon Menu Bar".
From there, the options that are available include the "New Assembly" option, or the "Existing Assembly" option. Select the option that corresponds with the desired assembly project to begin the transferring process.
Prepare for Assembly
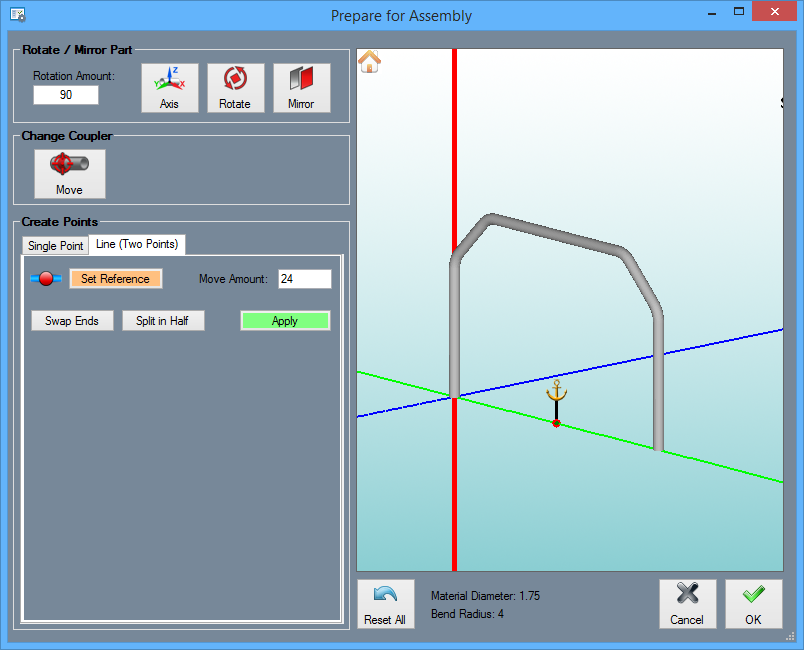
The "Prepare for Assembly" window was created so that users have the options to rotate the part to any desired orientation around any selected axis, mirror the part around any selected axis, and assign a coupler location using either the center of the axes (by default) or by first creating a new Pickpoint where the coupler can be placed.
Rotation Rotate / Mirror Part
The "Rotation Amount" ![]() value field is where the user can type in the degree of rotation that the part will be moved. every time the "Rotate" button is clicked.
value field is where the user can type in the degree of rotation that the part will be moved. every time the "Rotate" button is clicked.
Select the "Axis"  button and then click the axis in the display area that the part is going to rotate around.
Click the "Rotate"  button to rotate the part around the selected axis. Every time you click this button, the part will rotate by the degree typed into the "Rotate Amount" field.
Select the "Mirror"  button to mirror the part to the other side of the selected axis.
Change Coupler
Select the "Change Coupler"  button and then the point in the display area that will be set as the anchor. The coupler will match up with a Pickpoint in the Assembly designer on the project that this part is being transferred to.
Create Points
Single Point
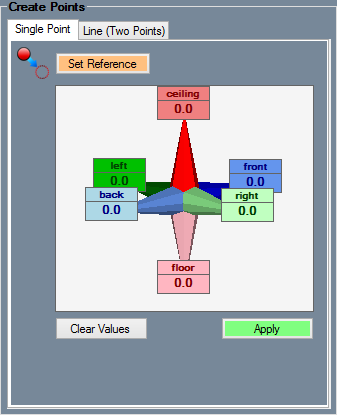
Create single Pickpoint locations under the "Single Point" tab in the "Create Points" section. These points will be placed in the display area, using the center of the axes as the origin (just like a Tri-star). For more information on designating Pickpoints please see the Assembly guide.
Line (Two-Points)
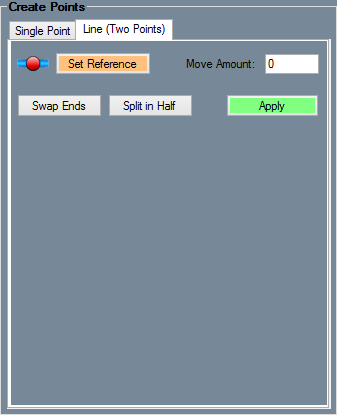
Create single points under the "Line (Two-Points)" tab. By selecting a single line on the part, or two points users can create a line in order to place a Pickpoint on it. The "Move Amount" value field creates a point along a selected line at a specific distance from the end. The "Split in Half" button places a point directly in the middle of the line or two points. The "Swap Ends" button changes the point from on end of the line to the other end.
Definitive Options
Reset all the changes that have been made to the part by selecting the "Reset All"  button.
Cancel the transfer by selecting the "Cancel"  button.
Select the "OK"  button to accept the changes made to the part and finish the transfer.


