Difference between revisions of "Dynatorch Dragon Guide"
| Line 196: | Line 196: | ||
<li style="display: list-item;">'''Copy''' Click the '''Copy''' [[File:Copy_The_Hole1.png]] button and the selected hole be copied and duplicated in the holes list. Doing this will make it much easier to set a similar hole in the design if you only need to change a few of the dimensions, or location settings.</li> | <li style="display: list-item;">'''Copy''' Click the '''Copy''' [[File:Copy_The_Hole1.png]] button and the selected hole be copied and duplicated in the holes list. Doing this will make it much easier to set a similar hole in the design if you only need to change a few of the dimensions, or location settings.</li> | ||
| − | + | <h2>Custom Design</h2> | |
| − | [[File:Dragon_Custom_Design( | + | [[File:Dragon_Custom_Design(2).png|right]] The '''"Custom Design"''' interface is where users will do all the fine tuning of their part before fabrication. Here, you will be able to create holes and text among other things, manipulate the tube to reverse it, retrieve dimensions for distances on the tube, assign contours with marking, etching and cutting actions, placing the plasma lead in and so forth. |
| Line 220: | Line 220: | ||
| − | + | <h3>Action Menu Buttons</h3> | |
[[File:Dragon_Action_Buttons1.png]] | [[File:Dragon_Action_Buttons1.png]] | ||
* The '''"Cancel"''' [[File:Dragon_Cancel1.png]] button is used to end a function that is currently in process or tied to your cursor. (Ex. If your text is tied to your cursor and you realize you made a typo, you can click the Cancel button and fix the typo before you place the text in the design.) | * The '''"Cancel"''' [[File:Dragon_Cancel1.png]] button is used to end a function that is currently in process or tied to your cursor. (Ex. If your text is tied to your cursor and you realize you made a typo, you can click the Cancel button and fix the typo before you place the text in the design.) | ||
| Line 235: | Line 235: | ||
* Click the '''"Paste"''' [[File:Dragon_Paste1.png]] button after using the '''Copy''' tool in order to paste the desired part back into the design. | * Click the '''"Paste"''' [[File:Dragon_Paste1.png]] button after using the '''Copy''' tool in order to paste the desired part back into the design. | ||
| − | + | <h3>Action Tabs</h3> | |
===Part Data=== | ===Part Data=== | ||
[[File:Dragon_Part_Data(1).png|right]]* The '''"Part Data"''' tab shows current material, cut length, full bending instructions, options to change the bend order, add cut-off and personal dates and notes associated with the current part. | [[File:Dragon_Part_Data(1).png|right]]* The '''"Part Data"''' tab shows current material, cut length, full bending instructions, options to change the bend order, add cut-off and personal dates and notes associated with the current part. | ||
| Line 245: | Line 245: | ||
*The '''Material''' [[File:Dragon_Material(2)2.png]] that is applied to the part is shown in the upper left hand corner of the tab under the Machine. | *The '''Material''' [[File:Dragon_Material(2)2.png]] that is applied to the part is shown in the upper left hand corner of the tab under the Machine. | ||
| − | *The ''' | + | *The '''Part Length''' section will show you the current part's length. |
[[File:Dragon_Bending_Instructions(1).png]] | [[File:Dragon_Bending_Instructions(1).png]] | ||
| − | |||
| − | |||
*The '''"Reverse Tube"''' [[File:Dragon_Reverse_Tube(1).png]] button will reverse all of the geometry of the part including copes, bend locations, text, holes, etc. '''This will NOT mirror the part itself.''' | *The '''"Reverse Tube"''' [[File:Dragon_Reverse_Tube(1).png]] button will reverse all of the geometry of the part including copes, bend locations, text, holes, etc. '''This will NOT mirror the part itself.''' | ||
| Line 260: | Line 258: | ||
*The '''"Notes:"''' [[File:Dragon_Notes(1).png]] text field is where users can input any notes specific to the current part. | *The '''"Notes:"''' [[File:Dragon_Notes(1).png]] text field is where users can input any notes specific to the current part. | ||
| − | + | <h3>Create Geometry</h3> | |
====Point==== | ====Point==== | ||
<li style="display: list-item;">[[File:Dragon_Cursor1.png|right]] | <li style="display: list-item;">[[File:Dragon_Cursor1.png|right]] | ||
| Line 349: | Line 347: | ||
<div style="clear:both"></div> | <div style="clear:both"></div> | ||
| − | + | <h3>Edit Geometry</h3> | |
====Features to Include==== | ====Features to Include==== | ||
| Line 401: | Line 399: | ||
<li style="display: list-item;">'''Break Gang:''' With "'''Break Gang:'''" selected, click on the entity that will be used to break intersecting entities. Click on the intersecting entities one at a time to break them at the point of intersection with the first entity. If the Create Point at Break box is checked, a point will be created at each break.</li> | <li style="display: list-item;">'''Break Gang:''' With "'''Break Gang:'''" selected, click on the entity that will be used to break intersecting entities. Click on the intersecting entities one at a time to break them at the point of intersection with the first entity. If the Create Point at Break box is checked, a point will be created at each break.</li> | ||
| − | + | <h3>Actions</h3> | |
[[File:Dragon_Actions1.png|right]] | [[File:Dragon_Actions1.png|right]] | ||
The Actions tab contains buttons to help the user assign contours with either cutting, etching or marking. Here, you are able to assign the lead-in location and finely tune the actions that the Dragon machine will take while fabricating your part. | The Actions tab contains buttons to help the user assign contours with either cutting, etching or marking. Here, you are able to assign the lead-in location and finely tune the actions that the Dragon machine will take while fabricating your part. | ||
| − | + | *'''Cutting:''' Click the '''"Cutting"''' [[File:Dragon_Cutout1.png]] button to access the cutting options. Options to select from include '''Start Cut, End Cut, Cutout, Peirce Hole, and Polyline Cut'''. | |
| − | |||
| − | |||
| − | |||
| − | *'''Cutting:''' Click the '''"Cutting"''' [[File:Dragon_Cutout1.png]] button to access the cutting options. Options to select from include '''Start Cut, End Cut, Cutout, Peirce Hole, Polyline | ||
*'''Start Cut:''' Click the '''"Start Cut"''' [[File:Dragon_Start_Cut2.png]] option followed by the start cut of the tube to designate it. | *'''Start Cut:''' Click the '''"Start Cut"''' [[File:Dragon_Start_Cut2.png]] option followed by the start cut of the tube to designate it. | ||
| Line 420: | Line 414: | ||
*'''Polyline Cut:''' Click the '''"Polyline Cut"''' [[File:Dragon_Polyline_Cut2.png]] option followed by a small section of geometry on a cut in order to convert all connected polylines to become a cut. | *'''Polyline Cut:''' Click the '''"Polyline Cut"''' [[File:Dragon_Polyline_Cut2.png]] option followed by a small section of geometry on a cut in order to convert all connected polylines to become a cut. | ||
| − | |||
| − | |||
*'''Cancel/Done:''' Click the '''"Cancel/Done"''' [[File:Dragon_Cancel_Done2.png]] button to deactivate the cut function that has been selected. | *'''Cancel/Done:''' Click the '''"Cancel/Done"''' [[File:Dragon_Cancel_Done2.png]] button to deactivate the cut function that has been selected. | ||
| − | |||
| − | |||
| − | |||
*'''Remove:''' Click the '''"Remove"''' [[File:Dragon_Remove_Contour1.png]] button and click and drag a window over a contour or series of contours in order to remove it/them from the design. | *'''Remove:''' Click the '''"Remove"''' [[File:Dragon_Remove_Contour1.png]] button and click and drag a window over a contour or series of contours in order to remove it/them from the design. | ||
| Line 434: | Line 423: | ||
*'''Move Lead:''' Click the '''"Move Lead"''' [[File:Dragon_Move_Lead.png]] button and then the notch that represents the lead-in for a cut-assigned contour. Then, select the lead-in's new location. This is the plasma torch's piercing point. | *'''Move Lead:''' Click the '''"Move Lead"''' [[File:Dragon_Move_Lead.png]] button and then the notch that represents the lead-in for a cut-assigned contour. Then, select the lead-in's new location. This is the plasma torch's piercing point. | ||
| − | *''' | + | <h2>Dragon Nesting</h2> |
| + | <h3>Action Tabs</h3> | ||
| + | ===Settings=== | ||
| + | *'''Machine:''' The '''"Machine"''' [[File:Dragon_Nesting_Material1.png]] section is where you select your desired machine. | ||
| + | |||
| + | *[[File:Dragon_Nesting1.png|right]] '''Material:''' The '''"Material"''' [[File:1material11.png]] section is where the current material is shown. This includes diameter and wall thickness. | ||
| + | |||
| + | *'''Stock Lengths:''' The '''"Stock Lengths"''' [[File:Dragon_Stock Length1.png]] can be entered and shown here. This is the overall length of your stock pipe or tubing. Multiple lengths of tubing can be added to accommodate an entire project. | ||
| + | |||
| + | *'''Apply:''' Click the '''"Apply"''' [[File:Dragon_Stock_Lengths_Apply1.png]] button when you have the stock lengths and quantities you are going to work with in the '''Stock Lengths''' list and they will appear in the display area to the right. | ||
| + | |||
| + | *'''Web Size:''' The '''"Web Size"''' [[File:Dragon_Web_Size1.png]] can be entered and shown here. This is the default distance allowed between parts as they appear on the stock length of tubing in the design. | ||
| + | |||
| + | *'''Ignore Start Cut:''' Checking the '''"Ignore Start Cut"''' [[File:Dragon_Ignore_Start_Cut1.png]] checkbox will cause the software to ignore the cut profile at the beginning of the stock tube. | ||
| + | |||
| + | ===Parts=== | ||
| + | [[File:Dragon_Parts_Tab1.png|right]] | ||
| + | |||
| + | *The '''"Parts"''' tab will show your parts and allow you to organize them according to order of fabrication. This tab will show the name, length and quantity of each part that has been imported into the current nesting project. | ||
| + | |||
| + | *'''Active Stick/Stick Selection:''' Click on the drop down menu displaying the current active stick [[File:Nest_Active_Stick1.png]] and select a new stick to activate it. Parts added to the nesting project within the Parts tab will always be added to the active stick selected here. You may also use the '''"Left"''' [[File:Nest_Left_Arrow1.png]] and '''"Right"''' [[File:Nest_Right_Arrow1.png]] arrows to change sticks quickly. | ||
| + | |||
| + | *'''Part Sorting:''' Click on the drop down menu [[File:Nest_Part_Sorting1.png]] next to the "Active Stick/Stick Selection" box and you can choose how the parts in the nesting project will be organized. | ||
| + | |||
| + | *'''Auto Fill:''' Click the '''"Auto Fill"''' [[File:Nest_Auto_Fill1.png]] button on the master part and your selected stick will be filled with copies of the master part chosen. | ||
| + | |||
| + | *'''Remove Part:''' Clicking the '''"Remove"''' [[File:Dragon_Remove_Part1.png]] button will remove the highlighted part from the part list above. | ||
| + | |||
| + | *'''Quantity:''' Clicking the '''"Quantity"''' [[File:1qualty1.png]] button will allow you to input the quantity you need for each part. | ||
| + | |||
| + | *'''Insert Part:''' Clicking the '''"Insert"''' [[File:Dragon_Insert_Part1.png]] button will allow the user to insert the highlighted part into the design at a location designated by the user. '''You may also double click the part in the list as a quick way to add the part to the stock tube.''' | ||
| + | |||
| + | *'''Re-Order:''' Clicking the '''"Re-Order"''' [[File:Dragon_Re_Order1.png]] button will allow the user to select a length of tubing in the display screen and move it to a new location in the order. | ||
| + | |||
| + | *'''Move:''' Clicking the '''"Move"''' [[File:Dragon_Move1.png]] button and clicking an intended part in the display screen will allow the user to move the part along with every part behind it. Clicking once more will set the lengths of tubing where they are at that time. | ||
| + | |||
| + | *'''Rotate:''' Clicking the '''"Rotate"''' [[File:Dragon_Rotate1.png]] button and clicking an intended part in the display screen will allow the user to rotate the part itself around the diameter of the tubing. Clicking once more will set the length of tubing where it is at that time. | ||
| + | |||
| + | *'''Remove:''' Clicking the '''"Remove"''' [[File:Dragon_Remove2.png]] button and clicking an intended part in the display screen will erase it from the nesting design. | ||
| + | |||
| + | *'''Rename:''' Clicking the '''"Rename"''' [[File:Nest_Rename1.png]] button will allow you to rename the current active stick. | ||
| + | |||
| + | ===Shifts=== | ||
| + | *[[File:Dragon_Shifts1.png|right]] The '''Shifts''' tab will allow the user to assign the actions of the machine to each specific contour, profile and mark within the nesting project. | ||
| + | |||
| + | *'''Delete Action:''' Click the '''"Delete Action"''' [[File:Dragon_Delete3.png]] button after a shift from the list above has been selected. It will be removed from the nesting project. | ||
| + | |||
| + | *'''Unassign Action:''' Click the '''"Unassign Action"''' [[File:Dragon_Assign_Actions1.png]] button after a shift action from the list above has been selected. Then, contours inside the highlighted area will be excluded from the shift. | ||
| + | |||
| + | *'''Refresh:''' Click the '''"Refresh"''' [[File:refreshl.png]] button to undo all alterations made in the shifts order. | ||
| + | ====Dimensions==== | ||
| + | '''Horizontal:''' Click the '''"Horizontal"''' [[File:Horizontal_Dim1.png]] button and click two points in the display window. A Dimension, along with dimension and extension lines, will appear and move with the cursor. Move the Dimension to the desired location using the cursor and click to place it. | ||
| + | |||
| + | '''Vertical:''' Click the '''"Vertical"''' [[File:Vertical_Dim1.png]] button and click two points in the display window. A Dimension, along with dimension and extension lines, will appear and move with the cursor. Move the Dimension to the desired location using the cursor and click to place it. | ||
| + | |||
| + | '''Linear:''' Click the '''"Linear"''' [[File:Linear_Dim1.png]] button and click two points in the display window. A Dimension, along with dimension and extension lines, will appear and move with the cursor. Move the Dimension to the desired location using the cursor and click to place it. | ||
| + | |||
| + | '''Inside:''' Click the '''"Inside"''' angle [[File:Inside_Angle1.png]] button to place an angle measure dimension at the inside of the intersection of two lines. First, select a line or reference point to represent the beginning of the dimension. Next, select the inside point of the line and/or the second reference line. Last, choose a location to place the dimension text. | ||
| + | |||
| + | '''Outside:''' Click the '''"Outside"''' angle [[File:Outside_Angle1.png]] button to place an angle measure dimension at the outside of the intersection of two lines. First, select a line or reference point to represent the beginning of the dimension. Next, select the outside point of the line and/or the second reference line. Last, choose a location to place the dimension text. | ||
| + | |||
| + | '''Delete:''' Click on the '''"Delete"''' [[File:Delete1.png]] button followed by a dimension in the design to delete it. | ||
| + | |||
| + | '''Free Select:''' Check the '''"Free Select"''' [[File:Drag_Nest_Free_Select1.png]] check box to enable the option to place a dimension anywhere in the design. When Free Select is disabled, placement of dimensions in the design will be constrained to a point. | ||
| + | |||
| + | *<div style="font-size:12pt;color:#CC0000;">'''Make Program File: When you are finished with your nesting project and are ready for fabrication, you can send all of this information to an .NC file by clicking on the "Make Program File" [[File:Make_Program_File1.png]] button at the top of the screen.'''</div> | ||
Revision as of 10:09, 7 March 2017
Take advantage of this page's Table Of Contents to find what section/item you're looking for information on.
Contents
- 1 Overview - Start Up
- 2 Tube Library
- 2.1 General
- 2.2 Machine Settings
- 2.3 Material Machine Settings Video
- 2.4 LeadIn/Out Defaults
- 2.4.1 Start/End Cut Lead Defaults: Ignite Settings
- 2.4.2 Ignite Type:
- 2.4.3 Dwell Time(sec):
- 2.4.4 Length/Distance:
- 2.4.5 Angle/Sweep:
- 2.4.6 Radius:
- 2.4.7 Start/End Cut Lead Defaults: Extinguish Settings
- 2.4.8 Extinguish Type:
- 2.4.9 Dwell Time(sec):
- 2.4.10 Length/Distance:
- 2.4.11 Angle/Sweep:
- 2.4.12 Radius:
- 2.5 Other Cut Lead Defaults
- 3 Straight Part Designer
- 4 Custom Design
- 5 Dragon Nesting
Overview - Start Up
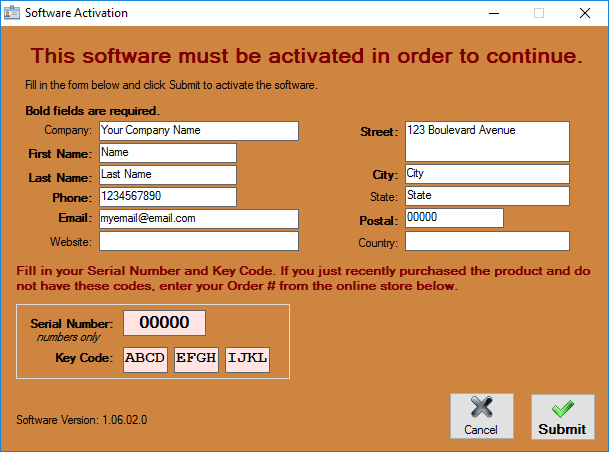
After receiving the Dragon software, all users will have to register the product with their personal identification along with a Dragon Serial number and Keycode (provided).
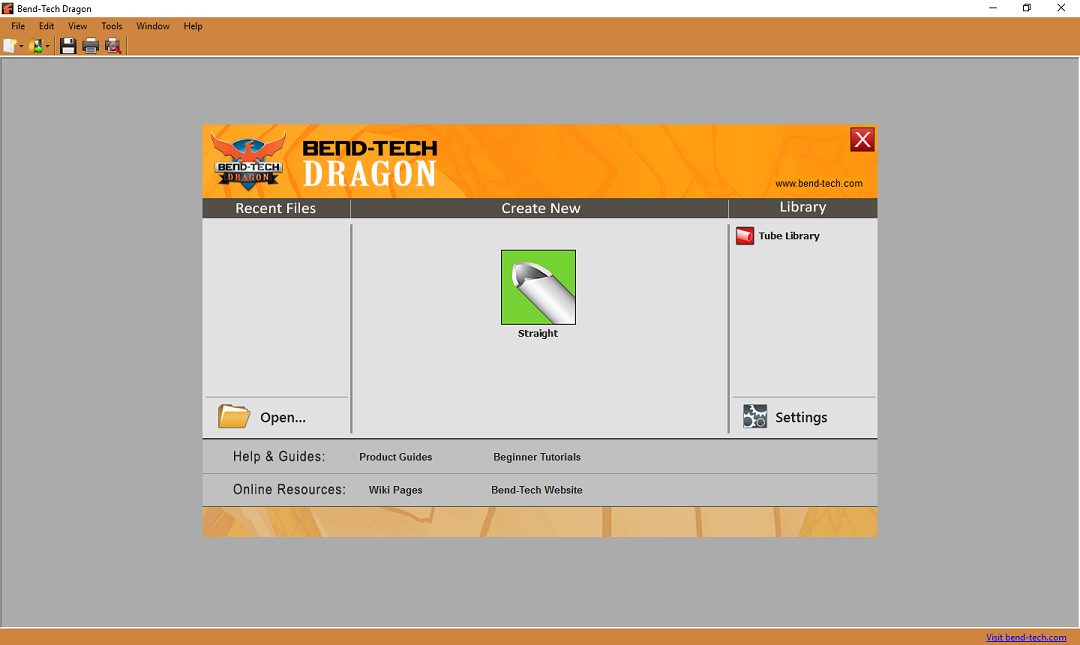
Upon initial startup, the software will display a splash screen and open to the Dragon Task Menu. Here, you will have the options from the Main Menu Bar above along with creating straight parts with the Straight Part coping designer.
Tube Library
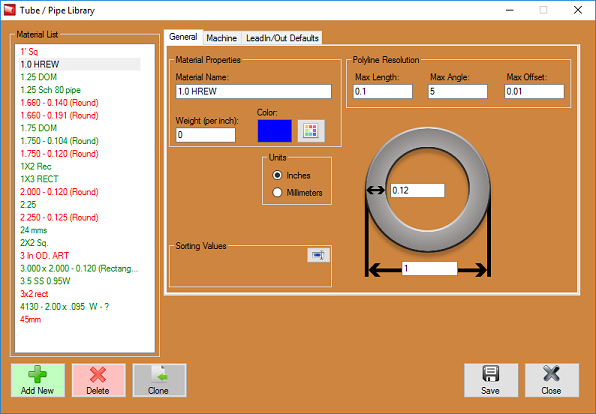
We first advise you to enter material information into the Tube Library (located to the right of the Task Menu screen in the Library section) in order to designate what material you will be working with on a particular job. Only after a material is added to the Tube Library can you create a part in the Straight Part coping designer.
General
Material Properties
Material Name:
- This title will be used to refer to the material throughout the software. It is recommended to give each a unique, descriptive name to more easily identify each material.
Weight (per inch):
- The weight of the material per unit can be supplied here. This value is completely optional, but it will be used to calculate the total weight of the part in the part designer interfaces above the results table.
Color:
- The color of the material can be chosen using the Color button.
 This color will be used to shade the material in various areas throughout the software.
Type:
- Tube material can be either round, square, or rectangle.
Units:
- Parts can be measured in either inches or millimeters.
Polyline Resolutions:
Max Length:
- This is where the user will enter the maximum length for each segment in a polyline. A segment will be ignored if it is longer than this value. If the segment is shorter, it may be combined with an adjacent segment to create a single segment.
Max Angle:
- This is where the user will enter the maximum angle between two segments in a polyline. If the angle is smaller than this value, the two segments may be combined to create a single segment.
Max Offset:
- This is where the user will enter the maximum boundary offset for a polyline. If the combination of two line segments breaches the boundary defined by this value, the features will not be combined.
Wall Thickness, Diameter, and Height:
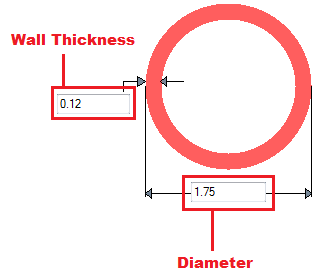
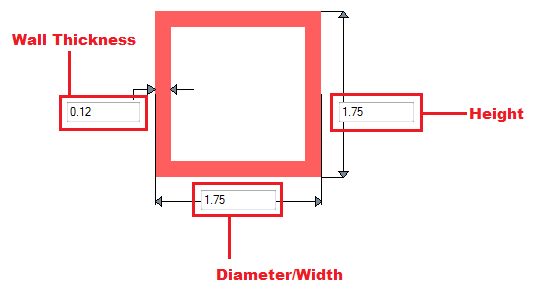
- Depending on the type of material chosen, there will be different dimensions that will need to be supplied. If the material is round or square, the wall thickness and diameter measurements will be required. These values will be entered into the fields on the material diagram. If the material is rectangular, the wall thickness, diameter/width, and height will need to be provided. Note: The diameter/width and height of all materials are measured from the outside edges.
Machine Settings
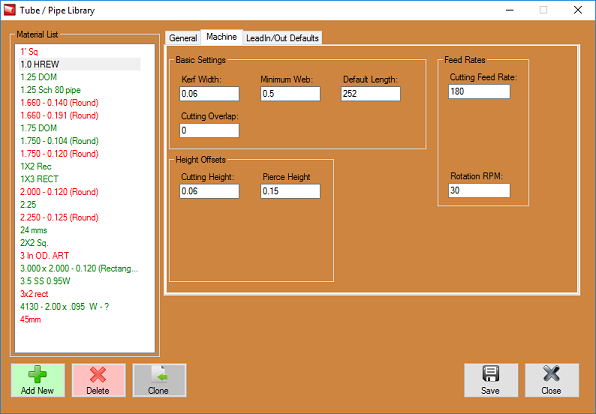
We recommend watching the video at the link below in order to understand what material settings should be applied for a typical entry. This has proven to be very helpful to many of our customers.
Material Machine Settings Video
Standard Material Machine Settings
NOTE: Machine Settings for Dynatorch users will not include the same options for Dragon machine owners. Your settings will only include the following options:
- Kerf Width
- Minimum Web
- Default (stock) Length
- Cutting Overlap
- Cutting Height
- Pierce Height
- Cutting Feed Rate
- Rotation RPM
These settings can be found in your cut charts in your torch manual... Any Thermal Dynamics torch inquiries will be re-directed to the Thermal Dynamics manufacturer as we do not offer technical support on their hardware.
LeadIn/Out Defaults
Start/End Cut Lead Defaults: Ignite Settings
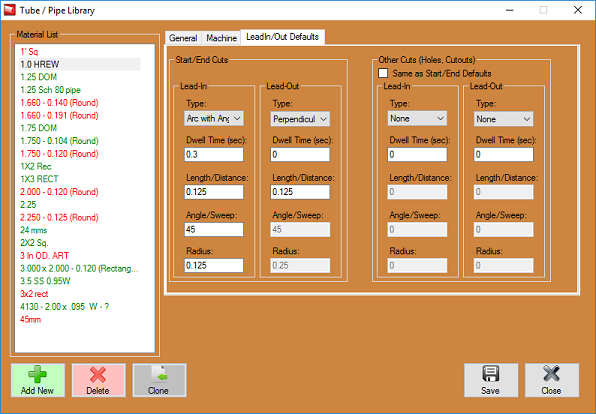
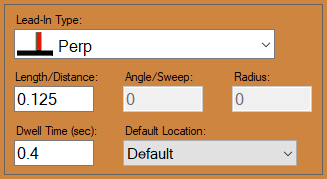
- These settings are completely user specified and can vary based on the user's preference.
-Suggested Settings-
Ignite Type:
- This is where the user will select the type of lead-in ignite type that will be set to this material by default. Arc with Angle is our preferred method. This means that the torch will initiate its cut into the material at an angle which will ease into an arc and then to the intended cut profile. This is a smooth ignite type and leaves little chance for error.
Dwell Time(sec):
- This indicates how long the torch will remain on one place during the pierce. This can differ based on your torch and material type and thickness. Refer to your hypertherm manual for an exact time. Links to manuals are located at the bottom of this page.
Length/Distance:
- This is the length of the line that eases into the actual cut profile. We can keep this relatively short. We recommend .125 in most cases.
Angle/Sweep:
- This will be the angle at which the initial cut eases into the intended cut. We recommend a 45 degree angle for the ignite cut.
Radius:
- This is where the user will enter the radius of the arc that channels into the cut profile. We recommend keeping this at around .125 as a preference.
Start/End Cut Lead Defaults: Extinguish Settings
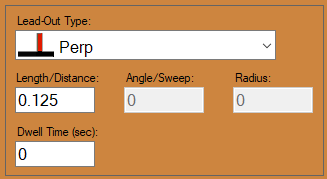
- These settings are completely user specified and can vary based on the user's preference.
-Suggested Settings-
Extinguish Type:
- This is where the user will select the type of lead-out extinguish type that will be set to this material by default. Perpendicular is our preferred method. This means that the torch will extinguish its cut at a perpendicular angle after the cut profile has been performed. This is a extinguish type that leaves the cut profile smoothly at a 90 degree angle.
Dwell Time(sec):
- This indicates how long the torch will remain on one place during the extinguishing stage of the torch. This can be set to 0.
Length/Distance:
- This is the length of the line that eases out of the cut profile. We can keep this relatively short. We recommend .125 in most cases.
Angle/Sweep:
- Opposite of the ignite type section, this will be the angle at which the cut eases out of the intended cut. This will be greyed out when the perpendicular extinguish type is set as a default.
Radius:
- This is where the user will enter the radius of the arc that channels out of the cut profile. This will be greyed out when the perpendicular extinguish type is set as a default.
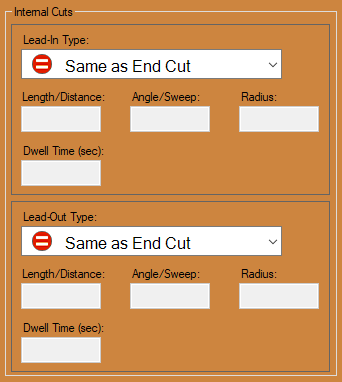
Other Cut Lead Defaults
- All other cut lead defaults can be set like the original cut lead defaults. These are meant for all cuts other that the start and end cuts of a part.
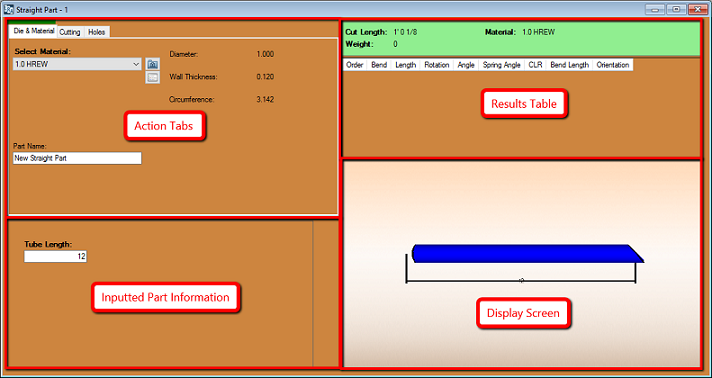
Straight Part Designer
- Clicking on this option will allow the user to create a straight part with either flat, coped or mitered end cuts. This option will also let the user account for rotation, angles and offsets for the tube ends.
Action Tabs
Select Material
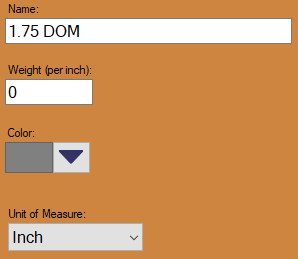
- The Select Material:" drop down menu is where users will choose their desired material.
Click the small Folder icon ![]() here to access your material library and select your material that way.
here to access your material library and select your material that way.
Click on the small Sort List icon ![]() here to access your materials by your sorted lists.
here to access your materials by your sorted lists.
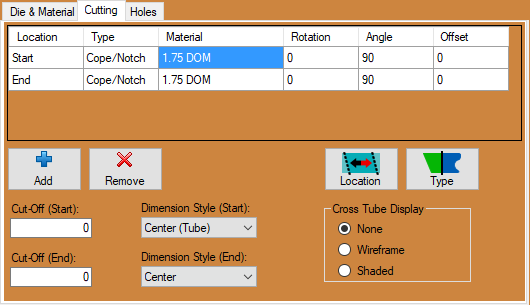
Cut Start / Cut End
The "Cutting" tab will determine the cuts on the starting of the tube and the cuts on the ending of the tube. Multiple cut nodes can be preformed to create any number of unique cut profiles.
- The "Location" section shows the location of the newly added cut (Start, or End). This location can be switched simply by clicking on the "Location"
 button or by double clicking the list item section itself.
- The "Type" section gives users the option to choose a type of cut from "Cope/Notch" and "Miter". This type of cut can be switched simply by clicking on the "Type"
 button or by double clicking the list item section itself.
- The "Material" section is a drop down menu that will give users the option to choose the size of tube that the current part will be intersecting with. This will adjust the size of the end cope(s) or miter cut profile(s).
- The degree of rotation entered into the "Rotation" field will determine the rotation of the cut on either the start or end of the tube.
- The degree of angle entered into the "Angle" field will determine the angle of the cut on either the start or end of the tube.
- The degree of offset entered into the "Offset:" field will determine how the intersecting tube is offset from the start or end of the tube.
- The value entered into the "Cut-Off (Start):" field will determine how many extra units (inches or millimeters) of tubing will be added to the start of the tube.
- The value entered into the "Cut-Off (End):" field will determine how many extra units (inches or millimeters) of tubing will be added to the end of the tube.
- The "Dimension Style" gives the user the option to choose the dimension of the cope/notch or miter from "Inside", "Center" and "Outside" dimensions as it pertains to the diameter of the tubing.
- Checking the "Display Cross Tubes" check box will cause the intersecting cross tube to appear in the display screen.
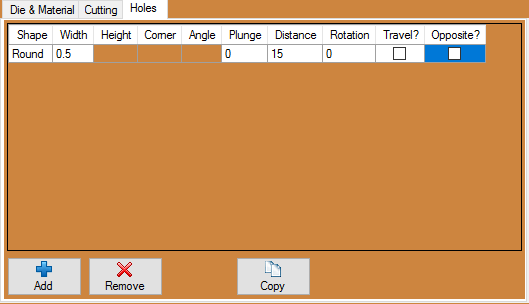
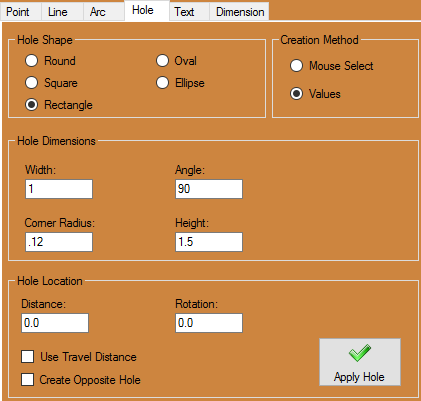
Holes
Shape
Hole Dimensions
Hole Location
Action Buttons
Custom Design
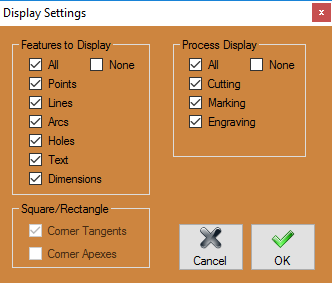
The "Custom Design" interface is where users will do all the fine tuning of their part before fabrication. Here, you will be able to create holes and text among other things, manipulate the tube to reverse it, retrieve dimensions for distances on the tube, assign contours with marking, etching and cutting actions, placing the plasma lead in and so forth.
Action Menu Buttons
- The "Cancel"
 button is used to end a function that is currently in process or tied to your cursor. (Ex. If your text is tied to your cursor and you realize you made a typo, you can click the Cancel button and fix the typo before you place the text in the design.)
- The "Back"
 button will allow you to go back and re-do a step while operating a multiple step function
- Click the "Free Select"
 button to enable the option to place an entity anywhere in the design. When Free Select is disabled, placement of entities in the design will be constrained to a point.
- Click the "Paste"
 button after using the Copy tool in order to paste the desired part back into the design.
Action Tabs
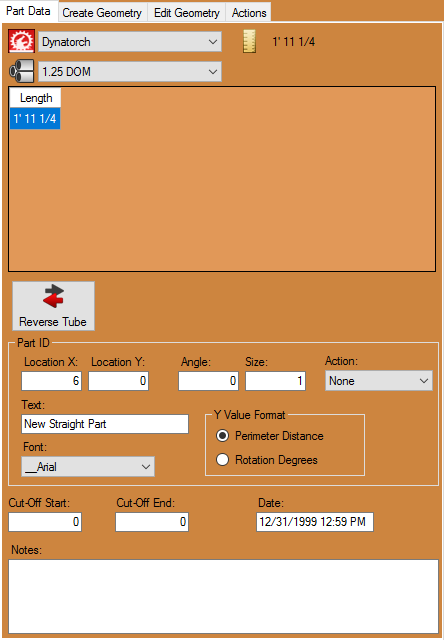
Part Data
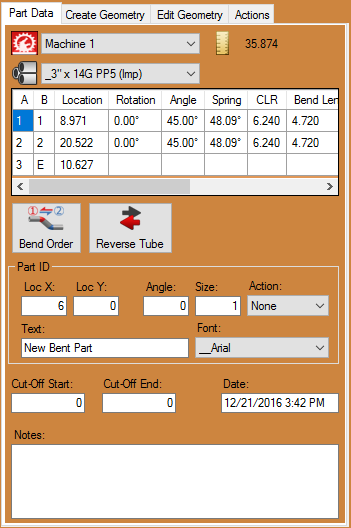
* The "Part Data" tab shows current material, cut length, full bending instructions, options to change the bend order, add cut-off and personal dates and notes associated with the current part.- The Material
 that is applied to the part is shown in the upper left hand corner of the tab under the Machine.
- The Part Length section will show you the current part's length.
- The "Reverse Tube"
 button will reverse all of the geometry of the part including copes, bend locations, text, holes, etc. This will NOT mirror the part itself.
- The "Cut-Off Start:"
 and "Cut-Off End:"
  text fields are where users can input values to add cut-off to either end of the tubing.
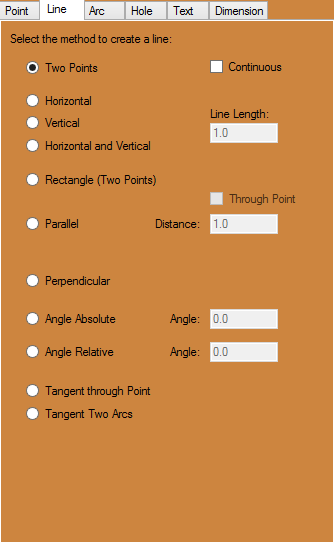
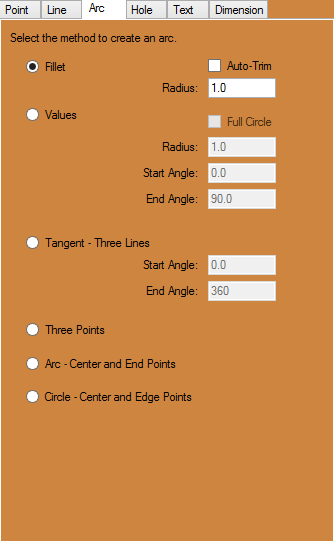
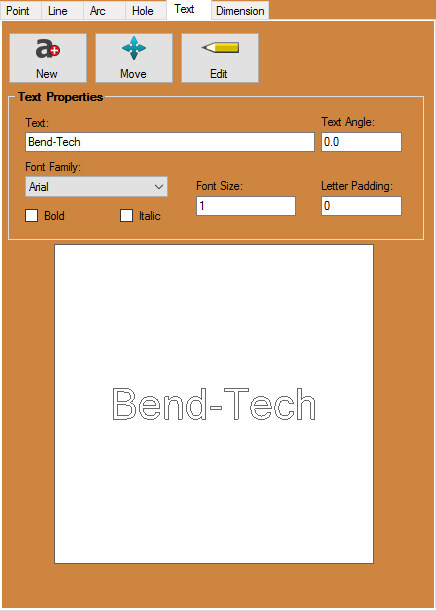
Create Geometry
Point
 button to place the point. The reference point will always be (0,0) (or the origin that shows X and Y in the display area).
 Line
Arc
Hole
Text
Dimension
Edit Geometry
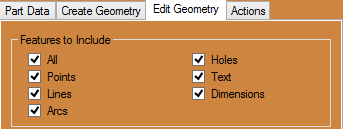
Features to Include
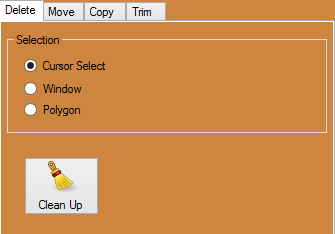
Delete
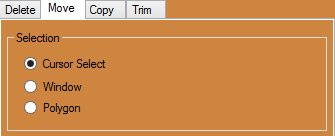
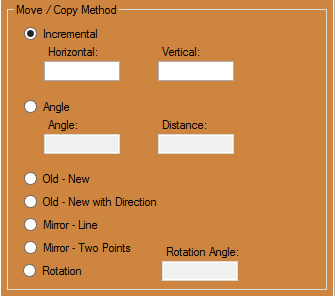
Move
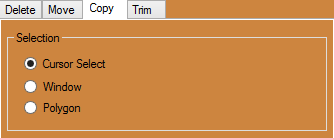
Copy
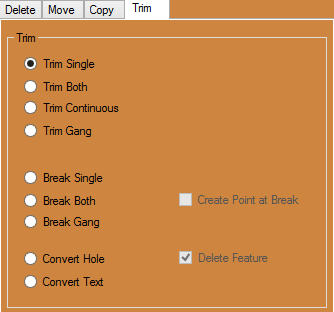
Trim
Actions
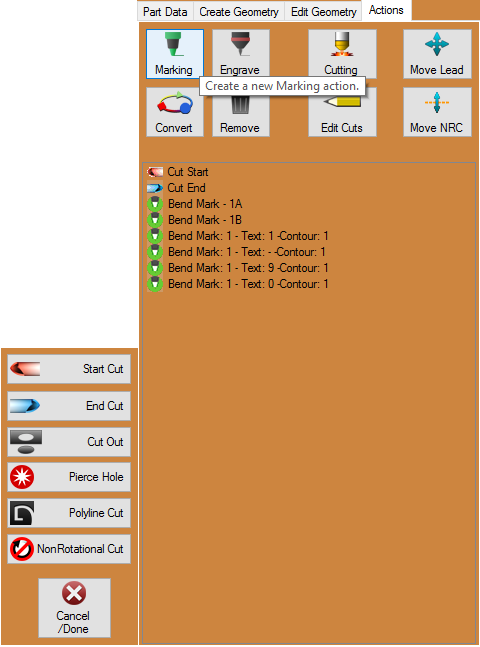
The Actions tab contains buttons to help the user assign contours with either cutting, etching or marking. Here, you are able to assign the lead-in location and finely tune the actions that the Dragon machine will take while fabricating your part.
- Cutting: Click the "Cutting"
 button to access the cutting options. Options to select from include Start Cut, End Cut, Cutout, Peirce Hole, and Polyline Cut.
- Cutout: Click the "Cutout"
 option followed by a contour in the design to designate the cutting action to that contour.
- Pierce Hole: Click the "Pierce Hole"
 option followed by a location on a cut to indicate the location of the pierce (This will be a small hole created with only the kerf width of the plasma torch).
- Polyline Cut: Click the "Polyline Cut"
 option followed by a small section of geometry on a cut in order to convert all connected polylines to become a cut.
- Remove: Click the "Remove"
 button and click and drag a window over a contour or series of contours in order to remove it/them from the design.
- Edit Cuts: Click the "Edit Cuts"
 button and selection options will appear to allow you to edit a cutout, start cut, end cut or other. See how to use these functions in the Dragon Custom Design Tutorial or click on the Edit Cuts page to see how they all work individually.
- Move Lead: Click the "Move Lead"
 button and then the notch that represents the lead-in for a cut-assigned contour. Then, select the lead-in's new location. This is the plasma torch's piercing point.
Dragon Nesting
Action Tabs
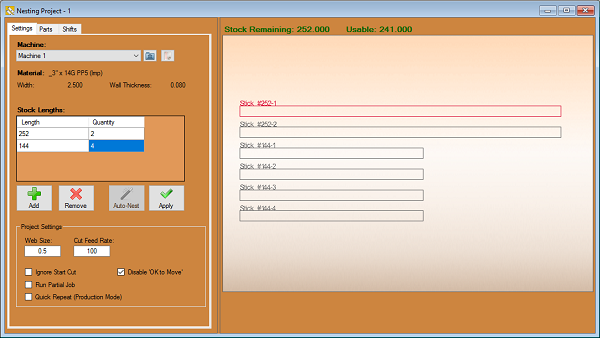
Settings
- Material: The "Material"
 section is where the current material is shown. This includes diameter and wall thickness.
- Stock Lengths: The "Stock Lengths"
 can be entered and shown here. This is the overall length of your stock pipe or tubing. Multiple lengths of tubing can be added to accommodate an entire project.
- Apply: Click the "Apply"
 button when you have the stock lengths and quantities you are going to work with in the Stock Lengths list and they will appear in the display area to the right.
- Web Size: The "Web Size"
 can be entered and shown here. This is the default distance allowed between parts as they appear on the stock length of tubing in the design.
- Ignore Start Cut: Checking the "Ignore Start Cut"
 checkbox will cause the software to ignore the cut profile at the beginning of the stock tube.
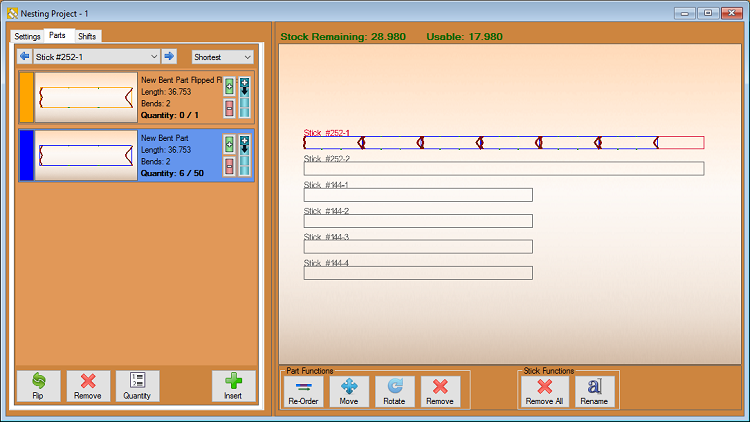
Parts
- The "Parts" tab will show your parts and allow you to organize them according to order of fabrication. This tab will show the name, length and quantity of each part that has been imported into the current nesting project.
- Active Stick/Stick Selection: Click on the drop down menu displaying the current active stick
 and select a new stick to activate it. Parts added to the nesting project within the Parts tab will always be added to the active stick selected here. You may also use the "Left"
  and "Right"
  arrows to change sticks quickly.
- Part Sorting: Click on the drop down menu
 next to the "Active Stick/Stick Selection" box and you can choose how the parts in the nesting project will be organized.
- Auto Fill: Click the "Auto Fill"
 button on the master part and your selected stick will be filled with copies of the master part chosen.
- Remove Part: Clicking the "Remove"
 button will remove the highlighted part from the part list above.
- Quantity: Clicking the "Quantity"
 button will allow you to input the quantity you need for each part.
- Insert Part: Clicking the "Insert"
 button will allow the user to insert the highlighted part into the design at a location designated by the user. You may also double click the part in the list as a quick way to add the part to the stock tube.
- Re-Order: Clicking the "Re-Order"
 button will allow the user to select a length of tubing in the display screen and move it to a new location in the order.
- Move: Clicking the "Move"
 button and clicking an intended part in the display screen will allow the user to move the part along with every part behind it. Clicking once more will set the lengths of tubing where they are at that time.
- Rotate: Clicking the "Rotate"
 button and clicking an intended part in the display screen will allow the user to rotate the part itself around the diameter of the tubing. Clicking once more will set the length of tubing where it is at that time.
- Remove: Clicking the "Remove"
 button and clicking an intended part in the display screen will erase it from the nesting design.
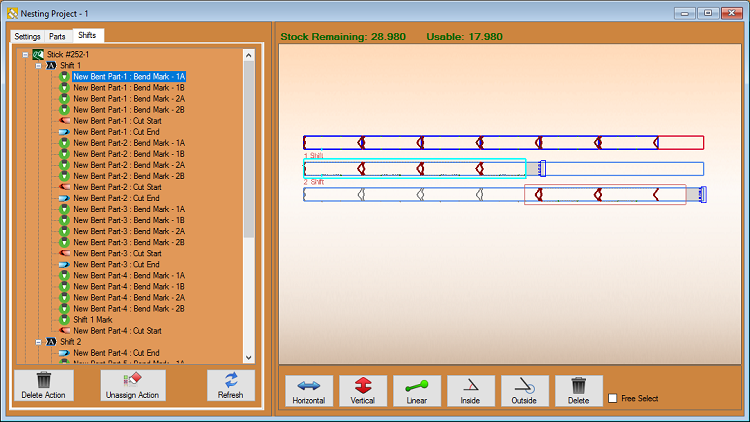
Shifts
- The Shifts tab will allow the user to assign the actions of the machine to each specific contour, profile and mark within the nesting project.
- Delete Action: Click the "Delete Action"
 button after a shift from the list above has been selected. It will be removed from the nesting project.
- Unassign Action: Click the "Unassign Action"
 button after a shift action from the list above has been selected. Then, contours inside the highlighted area will be excluded from the shift.
Dimensions
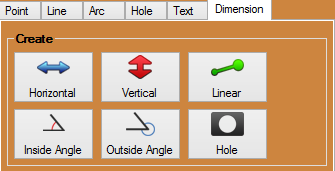
Horizontal: Click the "Horizontal" ![]() button and click two points in the display window. A Dimension, along with dimension and extension lines, will appear and move with the cursor. Move the Dimension to the desired location using the cursor and click to place it.
button and click two points in the display window. A Dimension, along with dimension and extension lines, will appear and move with the cursor. Move the Dimension to the desired location using the cursor and click to place it.
Vertical: Click the "Vertical" ![]() button and click two points in the display window. A Dimension, along with dimension and extension lines, will appear and move with the cursor. Move the Dimension to the desired location using the cursor and click to place it.
button and click two points in the display window. A Dimension, along with dimension and extension lines, will appear and move with the cursor. Move the Dimension to the desired location using the cursor and click to place it.
Linear: Click the "Linear" ![]() button and click two points in the display window. A Dimension, along with dimension and extension lines, will appear and move with the cursor. Move the Dimension to the desired location using the cursor and click to place it.
button and click two points in the display window. A Dimension, along with dimension and extension lines, will appear and move with the cursor. Move the Dimension to the desired location using the cursor and click to place it.
Inside: Click the "Inside" angle ![]() button to place an angle measure dimension at the inside of the intersection of two lines. First, select a line or reference point to represent the beginning of the dimension. Next, select the inside point of the line and/or the second reference line. Last, choose a location to place the dimension text.
button to place an angle measure dimension at the inside of the intersection of two lines. First, select a line or reference point to represent the beginning of the dimension. Next, select the inside point of the line and/or the second reference line. Last, choose a location to place the dimension text.
Outside: Click the "Outside" angle ![]() button to place an angle measure dimension at the outside of the intersection of two lines. First, select a line or reference point to represent the beginning of the dimension. Next, select the outside point of the line and/or the second reference line. Last, choose a location to place the dimension text.
button to place an angle measure dimension at the outside of the intersection of two lines. First, select a line or reference point to represent the beginning of the dimension. Next, select the outside point of the line and/or the second reference line. Last, choose a location to place the dimension text.
Delete: Click on the "Delete" ![]() button followed by a dimension in the design to delete it.
button followed by a dimension in the design to delete it.
Free Select: Check the "Free Select" ![]() check box to enable the option to place a dimension anywhere in the design. When Free Select is disabled, placement of dimensions in the design will be constrained to a point.
check box to enable the option to place a dimension anywhere in the design. When Free Select is disabled, placement of dimensions in the design will be constrained to a point.
