Edit Cuts
From Bend-Tech 7x Wiki
Selection Mode
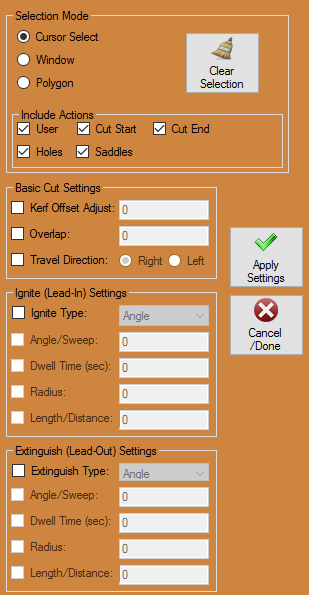
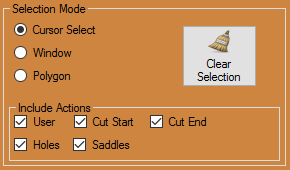
- In the Selection Mode section you will designate the manner in which you will select your cuts and which cuts will be included.
Cursor Select
- Selecting entities with the "Cursor Select:" option is the simplest. Just click on the entity or entities in the display area to select them.
Window
- Selecting entities with the "Window:" option is a two-click process. Simply click once to start creating the window and click again when you have enveloped the entity or entities you are trying to select ("All In" Default). Selecting the "All Out:" option will make it so everything outside the window will be selected. When the "Include Crossing:" checkbox is checked, every line or entity that touches the window will be included in the selection process.
Polygon
- When the "Polygon:" option is selected, the user will be able to envelop multiple entities clicking as many times as necessary with the continuous line feature. The entities will be selected once a previously made line is crossed ("All In" Default). Selecting the "All Out:" option will make it so everything outside the polygon will be selected after crossing a previously made line. When the "Include Crossing:" checkbox is checked, every line or entity that touches the window will be included in the selection process.
Clear Selection

- Click the Clear Selection button to undo your previous selection and start over.
Include Actions

- This section includes action options that, when checked, will be included in the selection process.
User
- Check the User checkbox and any user created cuts will be available to be chosen in the selection process.
Cut Start
- Check the Cut Start checkbox and any start cut will be available to be chosen in the selection process.
Cut End
- Check the Cut End checkbox and any end cut will be available to be chosen in the selection process.
Holes
- Check the Holes checkbox and any hole cutout will be available to be chosen in the selection process.
Saddles
- Check the Saddles checkbox and any saddle will be available to be chosen in the selection process.
Basic Cut Settings
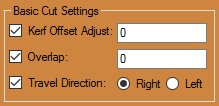
- This section will allow the user to input basic torch cutting settings. These will be applied only to the selected cutouts and only when the Apply Setting button has been selected.
Kerf Offset Adjust:
- Check the Kerf Offset Adjust checkbox and enter the amount for the kerf of the torch used on the selected cut(s).
Overlap:
- Check the Overlap checkbox and enter the value for the overlap distance the the torch will travel past the end of the cut. A positive number will cause the overlap to increase past the intended extinguish location, and a negative number will cause the torch to stop short of the intended extinguish location.
Travel Direction:
- Check the Travel Direction checkbox and select the Left or Right option to indicate the side of the cut that will be considered the working edge during cutting.
Ignite (Lead-In) Settings
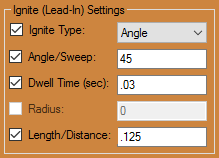
- These settings are completely user specified and can vary based on the user's preference.
Ignite Type:
- This is where the user will select the type of lead-in ignite type that will be set to the selected cut(s). Arc with Angle is our preferred method. This means that the torch will initiate its cut into the material at an angle which will ease into an arc and then to the intended cut profile. This is a smooth ignite type and leaves little chance for error.
Angle/Sweep:
- This will be the angle at which the initial cut eases into the selected cut(s). We recommend a 45 degree angle for the ignite cut.
Dwell Time(sec):
- This indicates how long the torch will remain on one place during the pierce. This can differ based on your torch and material type and thickness. Refer to your hypertherm manual for an exact time. Links to manuals are located at the bottom of this page.
Radius:
- This is where the user will enter the radius of the arc that channels into the selected cuts' profile. We recommend keeping this at around .125 as a preference.
Length/Distance:
- This is the length of the line that eases into the actual cut profile. We can keep this relatively short. We recommend .125 in most cases.
Extinguish (Lead-Out) Settings:
- These settings are completely user specified and can vary based on the user's preference.
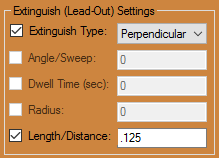
Extinguish Type:
- This is where the user will select the type of lead-out extinguish type that will be set to the selected cut(s). Perpendicular is our preferred method. This means that the torch will extinguish its cut at a perpendicular angle after the cut of the profile has been performed. This is a extinguish type that leaves the cut profile smoothly at a 90 degree angle.
Angle/Sweep:
- Opposite of the ignite type section, this will be the angle at which the cut eases out of the selected cut(s). This will be greyed out when the perpendicular extinguish type is set.
Dwell Time(sec):
- This indicates how long the torch will remain on one place during the extinguishing stage of the torch. This can be set to 0.
Radius:
- This is where the user will enter the radius of the arc that channels out of the selected cut profile. This will be greyed out when the perpendicular extinguish type is set as a default.
Length/Distance:
- This is the length of the line that eases out of the selected cut profile. We can keep this relatively short. We recommend .125 in most cases.
Apply Settings

- Click the Apply Settings button in order to apply the cut settings to the selected cut(s) in the design.
Cancel/Done

- Click the Cancel/Done button to close the Edit Cuts section and return to the list of actions for the design.
