Difference between revisions of "PickPoints - Arc"
| Line 4: | Line 4: | ||
| − | Step 1 | + | '''Step 1:''' Select the "PickPoint" tab and the "Plane/Arc" tab. |
| − | Step 2 | + | '''Step 2:''' Select the "Select Arc" command button. |
| − | Step 3 | + | '''Step 3:''' Select the "PickPoint" which represents the bend to place the new PickPoint. |
| − | Step 4 | + | '''Step 4:''' Enter in the "Sweep Angle" or number of degrees down the arc from the 1st tangent side of the arc. |
| − | Step 5 | + | '''Step 5:''' Select the "Apply" command button. |
[[File:Arc1.jpg|700px]] | [[File:Arc1.jpg|700px]] | ||
Latest revision as of 09:09, 30 September 2015
This thread covers creating a PickPoint on an arc.
Please Note: The tangent ends and the center of the arc automatically have part PickPoints (cyan in color)
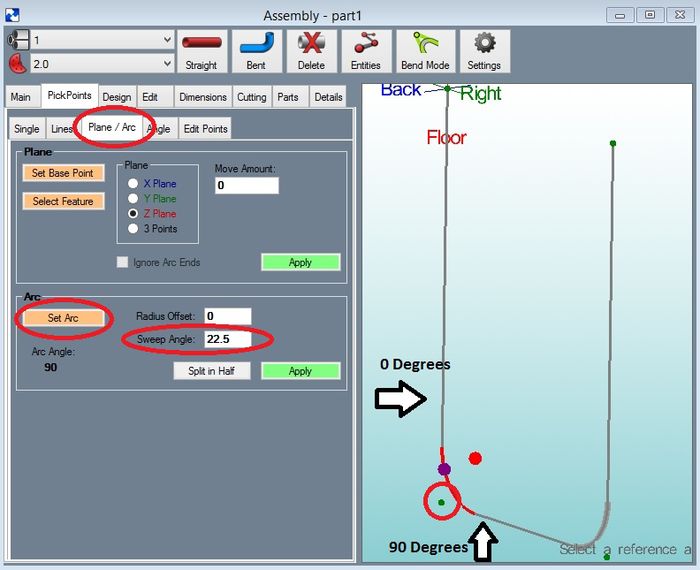
Step 1: Select the "PickPoint" tab and the "Plane/Arc" tab.
Step 2: Select the "Select Arc" command button.
Step 3: Select the "PickPoint" which represents the bend to place the new PickPoint.
Step 4: Enter in the "Sweep Angle" or number of degrees down the arc from the 1st tangent side of the arc.
Step 5: Select the "Apply" command button.
Note: The numbers of degrees for the entire arc is displayed above the "Sweep Angle". 0 (zero) degrees is on the arc end which is the start end. The start end was determined by the direction of the part creation.
