Difference between revisions of "Dragon"
| Line 86: | Line 86: | ||
'''10.''' The '''"Cancel"''' button will close the window and you will lose any information applied to the designed part. | '''10.''' The '''"Cancel"''' button will close the window and you will lose any information applied to the designed part. | ||
===OK=== | ===OK=== | ||
| − | '''11.''' The '''"OK"''' button will send the part shown to Dragon's flat layout mode known as '''" | + | '''11.''' The '''"OK"''' button will send the part shown to Dragon's flat layout mode known as '''"Custom Design"'''. |
| + | <div style="font-size:12pt;color:#CC0000;">'''To learn more about this interface, scroll down to the "Custom Design" section of this Wiki.'''</div> | ||
| + | |||
| + | <div style="font-size:12pt;color:#CC0000;">'''You may also skip the transfer to Custom Design step and send your part directly to the "Nesting" interface by clicking on the "Transfer to Nesting" [[File:Dragon_Transfer_To_Nesting(1).png]] button.'''</div> | ||
=Quick Nest= | =Quick Nest= | ||
[[File:Dragon_Quick_Nest(1).png|left]][[File:Dragon_Quick_Nest(2).png|right]] | [[File:Dragon_Quick_Nest(1).png|left]][[File:Dragon_Quick_Nest(2).png|right]] | ||
Revision as of 14:57, 8 October 2015
"UNDER CONSTRUCTION:THANK YOU FOR YOUR PATIENCE."
- Our Bend-Tech Dragon software works alongside with Bend-Tech Industrial and is meant to prep the part(s) or project before production using the Dragon machine.
- The "Dragon Task Menu" consists of 3 options for creating new parts. Bend-Tech Dragon will also allow transfers from Bend-Tech Industrial and other designers.
.png)
Contents
Bent Part
.png)
.png)
- Clicking on this option will allow the user to create a new "Custom Part" including bends and end cuts. It has many of the same characteristics of our "Custom Part" designer, except with a few additions that users will need in order to add copes or mitered cuts on the ends of the tubing.
Action Tabs
Die & Material
- The "Die & Material" section is where users will select the die which will be assigned to bend the part and the material associated with that die.
.png)
- The Select Material:"
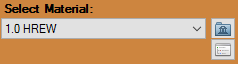 drop down menu is where users will choose their desired material.
.png)
- The "Select Die:"
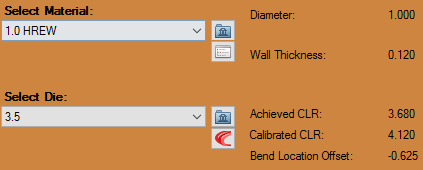 drop down menu is where users will choose their desired die.
.png)
- The section to the right of these drop down menus will show the information associated to the current die and material.
Cut Start / Cut End
The "Cut Start" tab will determine the cuts on the starting of the tube, while the "Cut End" tab will determine the cuts on the ending of the tube.
.png)
.png)
- The "Type of Cut" section gives users the option to choose a type of cut from "None", "Coping (Fishmouth)" and "Miter".
- The "Intersecting Tube:" drop down menu will give users the option to choose the size of tube that the current part will be intersecting with. This will adjust the size of the end cope(s) or miter cut profile(s).
- Checking the "Knifed Edge" check box will cause the coped or mitered cuts to appear as if they are cut flush to the intersecting tube.
- Checking the "Display Cross Tube" check box will cause the intersecting cross tube to appear in the display screen.
- Used only when the "Cut Type" is set to "Coping (Fishmouth)" or "Miter", the degree of rotation entered into the "Rotation:" field will determine the rotation of the cut on either the start or end of the tube.
- Used only when the "Cut Type" is set to "Coping (Fishmouth)" or "Miter", the degree of angle entered into the "Angle:" field will determine the angle of the cut on either the start or end of the tube.
- The value entered into the "Cut-Off:" field will determine how many extra units (inches or millimeters) of tubing will be added to the start or end of the tube.
- Used only when the "Cut Type" is set to "Coping (Fishmouth)", the value entered into the "Offset:" field will determine how the intersecting tube is offset from the start or end of the tube.
Manuf. Warning
The "Manufacturing Warning" tab will show the user if the part that was created is or isn't a valid part ready for production.
.png)
.png) button at the top of the screen. To learn more about this interface, scroll down to the "Custom Design" section of this Wiki.
button at the top of the screen. To learn more about this interface, scroll down to the "Custom Design" section of this Wiki..png) button.
button.Straight Part
.png)
.png)
- Clicking on this option will allow the user to create a straight part with either flat, coped or mitered end cuts. This option will also let the user account for rotation, angles and offsets for the tube ends.
Select Material:
1. The "Select Material:" drop down menu is where users will choose their desired material.
Type of Cut
2. The "Type of Cut (Start / End)" sections give users the option to choose a type of cut from "None", "Coping (Fishmouth)" and "Miter".
Intersecting Tube
3. The "Intersecting Tube:" drop down menu will give users the option to choose the size of tube that the current part will be intersecting with. This will adjust the size of the end cope(s) or miter cut profile(s).
Knifed Edge
4. Checking the "Knifed Edge" check box will cause the coped or mitered cuts to appear as if they are cut flush to the intersecting tube.
Tube Length:
5. The value entered into the "Tube Length:" field will determine the overall length of the part.
Rotation:
6. Used only when the "Cut Type" is set to "Coping (Fishmouth)" or "Miter", the degree of rotation entered into the "Rotation:" field will determine the rotational offset of the cuts on the tube. When the "Counter-clockwise" check box is checked, the rotation of the part will change counter-clockwise based on the rotational amount entered.
Angle:
7. Used only when the "Cut Type" is set to "Coping (Fishmouth)" or "Miter", the degree of angle entered into the "Angle:" field will determine the angle of the cut on either the start or end of the tube.
Offset:
8. Used only when the "Cut Type" is set to "Coping (Fishmouth)", the value entered into the "Offset:" field will determine how the intersecting tube is offset from the start or end of the tube.
Display Screen
9. The "Display Screen" is where your current part will be shown. Click the "Home" button in the upper left hand corner to return the part to its original view.
Cancel
10. The "Cancel" button will close the window and you will lose any information applied to the designed part.
OK
11. The "OK" button will send the part shown to Dragon's flat layout mode known as "Custom Design".
button.Quick Nest
.png)
.png)
Clicking on this option will give you the ability to nest multiple length parts together in order to accommodate the stock length of tubing you are working with.
Select Material:
1. The "Select Material:" drop down menu is where users will choose their desired material. To the right, the material information will be shown.
Stock Length:
2. The "Stock Length:" field is where users will enter the stock length of their material (in inches or millimeters based on the units of measurement specified in the "Options" menu).
Needed Lengths:
3. The "Needed Lengths:" section is where users will enter the values of their part lengths and quantities of each. These can be added by selecting the "Add" button below this section.
Add
4. Clicking the "Add" button will allow another line to be added to the "Needed Lengths:" section.
Remove
5. Clicking the "Remove" button will remove a line from the "Needed Lengths:" section.
Cancel
6. Clicking the "Cancel" button will close the simple nesting window and you will lose any progress made in this window.
OK
7. Clicking the "OK" button will send the "Needed Lengths:" to the "Dragon CAM Nesting" interface where users will be able to view the lengths nested along their stock length of tubing. Editing can also be done there as well.