Difference between revisions of "Dragon Nesting Tutorial"
(→Tutorial) |
|||
| (22 intermediate revisions by the same user not shown) | |||
| Line 13: | Line 13: | ||
| − | 2. With the | + | 2. With the Dragon Design window open, click on the '''Transfer to Nesting''' [[File:Drag_Transfer_To-Nesting1.png]] drop down menu at the top of the screen and select the '''New Project''' option. |
[[File:New_Nesting_Proj1.png]] | [[File:New_Nesting_Proj1.png]] | ||
| − | 3. | + | 3. Now, maximize the screen [[File:Min_Max_Close_Tab.png]] and enter '''140''' into the '''Stock Length:''' value field to the left of the display screen. Also, set the '''Quantity''' to '''1'''. The '''Web Size:''' should be set to '''0.5''''' |
| + | |||
| + | [[File:Drag_Nest_Stock_Length_140.png]][[File:Drag_Nest_Web_Size_0_5.png]] | ||
| + | |||
| + | |||
| + | 4. Now click the '''Apply''' [[File:Drag_Apply1.png]] button to set the stock tube length in the display area to the right. | ||
| + | |||
| + | 5. Next, to add parts to the nesting project, click on the '''Parts''' [[File:Drag_Nest_Parts_Tab1.png]] tab. | ||
| + | |||
| + | 6. Now, double click on our part '''five''' times to add 5 copies of it to our nesting design, or simply click the blue addition symbol [[File:blueaddsign.png]] to fill the stock length. | ||
| + | |||
| + | [[File:Drag_Nest_Stock_Part1.png]][[File:Drag_Nest_Stock_Part2.png]] | ||
| + | |||
| + | |||
| + | 7. Still under the '''Parts''' tab, select the '''Move''' [[File:Dragon_Move1.png]] button from the bottom of the screen followed by the second to the last part in the design. Then, drag this part the one on the end (tied to our part) near the end of the stock tube. | ||
| + | |||
| + | [[File:Drag_Nest_Stock_Part3.png]] | ||
| + | |||
| + | |||
| + | 8. Now, click the '''Rotate''' [[File:Dragon_Rotate1.png]] button and rotate the last two parts in the design so that the two oval holes cross over both the top and bottom edges of the unfolded tube. | ||
| + | |||
| + | [[File:Drag_Nest_Stock_Part4.png]] | ||
| + | |||
| + | |||
| + | 9. Next, click the '''Remove''' [[File:Dragon_Remove2.png]] button and select these last two parts to delete them from the nesting design. | ||
| + | |||
| + | [[File:Drag_Nest_Stock_Part5.png]] | ||
| + | |||
| + | |||
| + | 10. Now, switch to the '''Shifts''' [[File:Drag_Nest_Shifts1.png]] tab to see the shifts that the Dragon machine will take in fabricating this project. | ||
| + | |||
| + | [[File:Dragon_Nest_Shifts1.png]] | ||
| + | |||
| + | |||
| + | 11. From here, click on the first oval hole [[File:shift_first_oval.png]] near the top of the list to your left and click the '''Unassign Action''' [[File:Dragon_Assign_Actions1.png]] button below. The contours for the hole will be removed from the shift in the display area and the listed item will be moved to the bottom under the Un-Assigned Actions section. | ||
| + | |||
| + | |||
| + | *'''Note: Unassigning an action in the shift will cause the Dragon machine to ignore the action entirely, but it can always be placed back in the list of assigned actions simply by dragging it back in the list. Clicking the Delete Action [[File:Dragon_Delete3.png]] button will remove the action from the file completely.''' | ||
| + | |||
| + | 12. Once you are satisfied with the order of actions within the shift, all that is left to do is select the '''"Transfer to Machine"''' [[File:Dragon_Trasfer_To_Mach1.png]] button at the top of the screen. | ||
Latest revision as of 13:13, 27 December 2016
Things To Know
- This tutorial will step you through the process of creating a nesting project in Bend-Tech Dragon and show you how simple it is to send your project to your Dragon machine. As you walk through this tutorial, procedures are designed based on your knowledge of earlier procedures. Because of this, it is very important that you carefully step through this guide, understanding everything along the way.
If you have not completed the Dragon Straight Part Tutorial and Dragon Custom Design Tutorial, please do so before continuing any further.
Tutorial
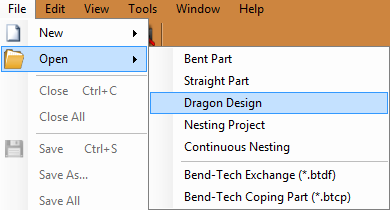
1. Start by opening the Bend-Tech Dragon software and opening the file saved from the Dragon Custom Design Tutorial labeled Dragon Test2. Do this by selecting File - Open - Dragon Design from the top left of the window, selecting the file, then clicking the Open button.
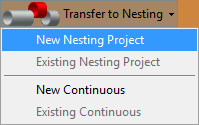
2. With the Dragon Design window open, click on the Transfer to Nesting ![]() drop down menu at the top of the screen and select the New Project option.
drop down menu at the top of the screen and select the New Project option.
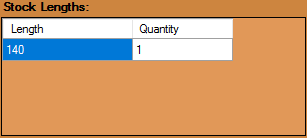
3. Now, maximize the screen ![]() and enter 140 into the Stock Length: value field to the left of the display screen. Also, set the Quantity to 1. The Web Size: should be set to 0.5
and enter 140 into the Stock Length: value field to the left of the display screen. Also, set the Quantity to 1. The Web Size: should be set to 0.5
4. Now click the Apply ![]() button to set the stock tube length in the display area to the right.
button to set the stock tube length in the display area to the right.
5. Next, to add parts to the nesting project, click on the Parts ![]() tab.
tab.
6. Now, double click on our part five times to add 5 copies of it to our nesting design, or simply click the blue addition symbol ![]() to fill the stock length.
to fill the stock length.
7. Still under the Parts tab, select the Move ![]() button from the bottom of the screen followed by the second to the last part in the design. Then, drag this part the one on the end (tied to our part) near the end of the stock tube.
button from the bottom of the screen followed by the second to the last part in the design. Then, drag this part the one on the end (tied to our part) near the end of the stock tube.
8. Now, click the Rotate ![]() button and rotate the last two parts in the design so that the two oval holes cross over both the top and bottom edges of the unfolded tube.
button and rotate the last two parts in the design so that the two oval holes cross over both the top and bottom edges of the unfolded tube.
9. Next, click the Remove ![]() button and select these last two parts to delete them from the nesting design.
button and select these last two parts to delete them from the nesting design.
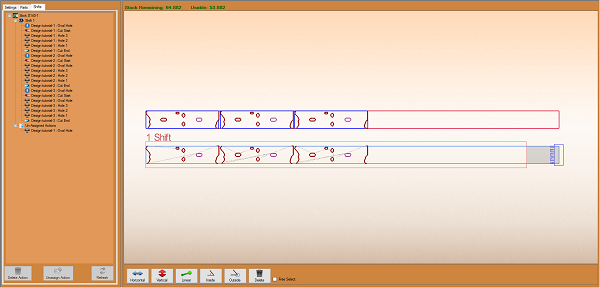
10. Now, switch to the Shifts ![]() tab to see the shifts that the Dragon machine will take in fabricating this project.
tab to see the shifts that the Dragon machine will take in fabricating this project.
11. From here, click on the first oval hole  near the top of the list to your left and click the Unassign Action
 ![]() button below. The contours for the hole will be removed from the shift in the display area and the listed item will be moved to the bottom under the Un-Assigned Actions section.
button below. The contours for the hole will be removed from the shift in the display area and the listed item will be moved to the bottom under the Un-Assigned Actions section.
- Note: Unassigning an action in the shift will cause the Dragon machine to ignore the action entirely, but it can always be placed back in the list of assigned actions simply by dragging it back in the list. Clicking the Delete Action
 button will remove the action from the file completely.
12. Once you are satisfied with the order of actions within the shift, all that is left to do is select the "Transfer to Machine"  button at the top of the screen.


