Difference between revisions of "Settings"
| Line 9: | Line 9: | ||
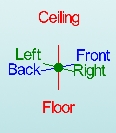
'''Display Tri-Star:''' Use the Display Tri-Star checkbox to toggle the Tri-Star on or off. | '''Display Tri-Star:''' Use the Display Tri-Star checkbox to toggle the Tri-Star on or off. | ||
| − | DimSettings3. | + | [[File:DimSettings3.jpg]] |
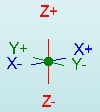
'''XYZ Tri-Star:''' Use the XYZ Tri-Star checkbox to toggle the XYZ Tri-Star on or off. | '''XYZ Tri-Star:''' Use the XYZ Tri-Star checkbox to toggle the XYZ Tri-Star on or off. | ||
| − | DimSettings4. | + | [[File:DimSettings4.jpg]] |
'''Display Background Image:''' If you have a background image selected, checking the Display Background Image checkbox will display it. | '''Display Background Image:''' If you have a background image selected, checking the Display Background Image checkbox will display it. | ||
Revision as of 11:22, 5 June 2014
Background Image: Click the Choose button and use the browser to find a Bitmap image. The image will be displayed as a static background image. The Display Background Image checkbox must be checked in order to use a background image.
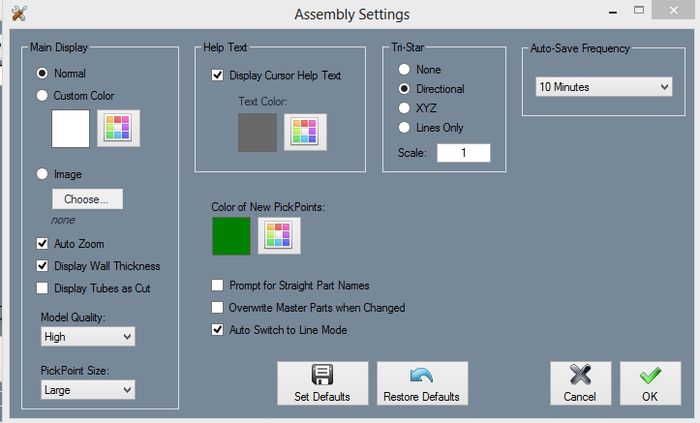
Auto-Save Frequency: Use the drop down menu to choose how often the program auto-saves the current project.
Auto Zoom: If you are creating a new entity that extends beyond the screen and Auto Zoom is checked, the screen will automatically zoom out to fit the entity on the screen.
Display Tri-Star: Use the Display Tri-Star checkbox to toggle the Tri-Star on or off.
XYZ Tri-Star: Use the XYZ Tri-Star checkbox to toggle the XYZ Tri-Star on or off.
Display Background Image: If you have a background image selected, checking the Display Background Image checkbox will display it.
Display Cursor Help Text: When the cursor is moved over certain items, help text will appear that describes how to use the item. To turn this off, uncheck the Display Cursor Help Text checkbox.
Prompt for Straight Part Names: When a straight part is created, it will automatically be given a generic name. To have Bend-Tech prompt you to enter a name for each new straight part, check the Prompt for Straight Part Names checkbox.
Display Tubes as Cut: Checking the Display Tubes as Cut checkbox will cause all tubes with cuts applied to them to actually have the specified cuts shown in the display window. Unchecking this box will improve performance.
Overwrite Master Parts when Changed: When you make changes to a part, a new version of the part will be created with the changes applied and the old version will remain untouched. If the Overwrite Master Parts when Changed checkbox is checked, the master parts in the Master Part List will be directly edited, and new versions of the part will not be created automatically.
Display Material Thickness: Use the Display Material Thickness checkbox to toggle whether the inside of the tube is rendered as being hollow or not. Unchecking this checkbox will improve performance.
Model Quality: Use the Model Quality drop down menu to change the quality of the models in the display window.
PickPoint Size: Use the PickPoint size drop down menu to change the size of all PickPoints in the Assembly project.


