Difference between revisions of "Dragon Bent Part Tutorial"
| Line 10: | Line 10: | ||
2. Now, maximize the screen [[File:Min_Max_Close_Tab.png]]. | 2. Now, maximize the screen [[File:Min_Max_Close_Tab.png]]. | ||
| − | 3. Next, enter the values in the LRA value fields to the left of the display screen according to the picture shown below. | + | 3. Next, select '''4''' from the '''Number of Bends''' [[File:Drag_4_Number_Of_Bends1.png]] drop down menu to the far left. |
| + | |||
| + | 4. Now, enter the values in the LRA value fields to the left of the display screen according to the picture shown below. | ||
[[File:Drag_Bent_LRA_Values1.png]] | [[File:Drag_Bent_LRA_Values1.png]] | ||
Revision as of 11:30, 19 January 2016
Dragon Bent Part Tutorial 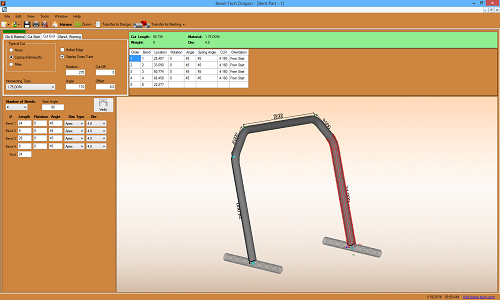

Things To Know
- This tutorial will step you through the process of creating a bent part design in Bend-Tech Dragon and show you the possible choices for where to take it next depending on your needs. As you walk through this tutorial, procedures are designed based on your knowledge of earlier procedures. Because of this, it is very important that you carefully step through this guide, understanding everything along the way.
Tutorial
1. From the Bend-Tech Dragon start up screen, click on the Bent .png) button to open the bent part interface.
button to open the bent part interface.
2. Now, maximize the screen ![]() .
.
3. Next, select 4 from the Number of Bends ![]() drop down menu to the far left.
drop down menu to the far left.
4. Now, enter the values in the LRA value fields to the left of the display screen according to the picture shown below.
