Difference between revisions of "Reverse Design"
| Line 32: | Line 32: | ||
To change the starting angle of the part, enter a value in the '''Start Angle''' field. | To change the starting angle of the part, enter a value in the '''Start Angle''' field. | ||
| − | + | Below all these options, the length, rotation, and angle values can be entered for each part's bend and the end length. | |
| − | To | + | '''To add a length, rotation, angle, or end value''', just enter a number into any of the fields. |
| − | + | Each bend will have a '''Die''' drop down menu. Different dies can be selected for each bend by clicking any of the '''Die''' drop down menus and select a die. | |
| − | |||
| − | |||
Revision as of 09:15, 5 June 2014
Bend-Tech 7x Wiki :: Reverse Design
The purpose the Reverse Design interface is to have a way to re-create a part by entering in a part's lengths, rotation amounts, and angles of the parts bends or by entering the information from a setup sheet.
The Reverse Design interface has a more customizable length and rotation settings. Go to the Part Details tab, Part Settings button, and then the Design Input tab or see the Tools menu, Options, Design Settings, and Reverse Design - Length and Rotation sections to set the defaults for Reverse Design.
Selection
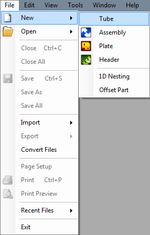
To create a Sketch 3D Part:1.) Go to the File menu, select New, then select Tube. In the Create New menu, click on the Sketch 3D option.
2.) Click the New Part icon and select the Sketch 3D option in theCreate New menu.
...OR
3.) Select the Sketch 3D option from the task menu that appears when the software starts up or when all designs are closed.
Design
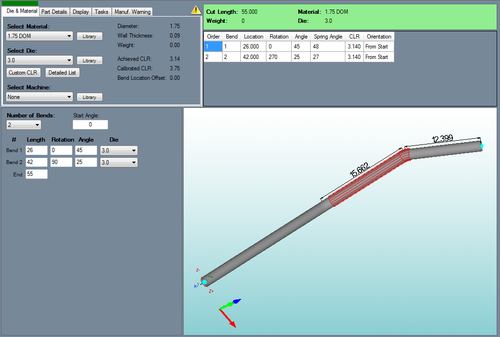
Once 'Reverse Design' has been selected, a new Reverse Design part design window will open. If a default die and material have not been set, a die and material must be chosen before designing the part. If necessary, choose a material and die in the Die and Material tab. Once a die and material are selected, the Reverse Design part design section will appear.
The number of bends can be chosen from the Number of Bends drop down menu by clicking it and selecting a bend amount. Up to 50 bends can be added to a part. To the right of the design coordinates, a list of every bend will be shown along with the end length.
To change the starting angle of the part, enter a value in the Start Angle field.
Below all these options, the length, rotation, and angle values can be entered for each part's bend and the end length.
To add a length, rotation, angle, or end value, just enter a number into any of the fields.
Each bend will have a Die drop down menu. Different dies can be selected for each bend by clicking any of the Die drop down menus and select a die.

