Panel Tutorial
"UNDER CONSTRUCTION: THANK YOU FOR YOUR PATIENCE"
This tutorial is designed to walk the user through the steps in making a Panel in the Assembly interface.
Things To Know
- This tutorial is designed to walk the user through creating a Panel in the Assembly design interface. As you go through this tutorial, later procedures will assume that you understand all earlier procedures. Because of this, it is very important that you carefully step through this guide, understanding everything along the way and following all steps in order.
- A few key items need to be addressed before starting the step-by-step instructions of this tutorial. It is very important for Bend-Tech users to completely understand these items:
- 1) PickPoints
- PICKPOINTS ARE USED FOR EVERYTHING. The Assembly part of the software is largely run in full 3D. Because a computer screen is only 2D, there is an unlimited amount of depth behind and in front of the cursor. A PickPoint is a point in 3D space that can be used for creating, editing, and placing parts in Assembly design. PickPoints can be placed in a 2D environment by having their depth manually entered in the appropriate value fields.
- There are 2 types of PickPoints; Those automatically created by the part by default (various colors) and user-defined points (green). In addition, the initial (0,0,0) point is an automatic point that resides at the center of the Tri-Star. The Tri-Star is our directional definition locator.
- 2) Center Line & Apex
-
- Center Line: In the Assembly design environment we are working exclusively with the center-line of a part, as compared to the inside or outside.
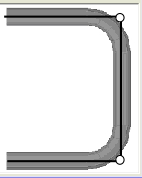
- Apex: Most bend locations are created in Assembly design with the Apex. Our definition of apex is the intersection of the straight tubes as if there wasn’t a radius.
- This is demonstrated in the picture below.
- 3) Locational Orientation
-
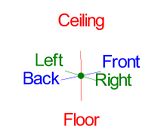
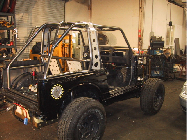
- Designing seems to work the best if users imagine they are standing behind the vehicle at a 45 degree angle. This way left is left and right is right. Take a minute and examine the Tri-Star to get your orientation.
- Notice how the truck in the picture is setup with the same orientation.
- 4) Defining Parts
-
- It is possible to create parts in the template and custom part interfaces, however, starting out this way tends to get confusing for new users of the software. It appears that there is a higher level of success with customers who start out designing parts directly in the assembly interface.
Start Up
1) Start by double clicking the "Bend-Tech 7x" icon to start up the program.2) Select the "Assembly" icon ![]() in the Task Menu under the "Create New" section to open the Assembly interface. The window that opens should be labeled [Assembly – 1].
in the Task Menu under the "Create New" section to open the Assembly interface. The window that opens should be labeled [Assembly – 1].
3) For the purposes of this tutorial, click the "Maximize" button ![]() at the top right of the Assembly design window.
at the top right of the Assembly design window.
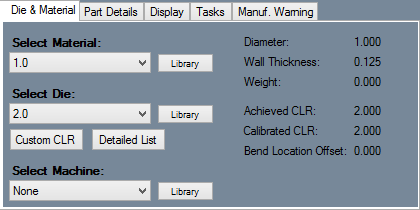
4) For the purposes of this tutorial. The "Die & Material" tab is located in the upper left corner of the window. Select the "1.00 Material" and "2.0 Die" as seen here.
Creating the Part
- In this tutorial we will be creating a five-sided part to design a panel on.
- Select the “PickPoints” tab and the “Single” sub-tab.
- Type “24” in the dark red “Ceiling” value field and click the Tri-Star in the display area to create the first PickPoint.
- Select the “Apply” button.
- Now, type “32” in the “Ceiling” value field and “12” in the “Right” value field.
- Select the “Apply” button.
- Change both the "Ceiling" and "Right" value fields to "24" and select the "Apply" button.
- Lastly, change the "Ceiling" value field to "0" and select "Apply".
- (Note) Be sure not to select the "Clear Values" button though this entire process.


