Difference between revisions of "Cutting Tutorial"
(Created page with "In this tutorial you will learn how to add cuts to tubes in an assembly project. __NOTOC__ <h2>'''Step 1'''</h2> right|500px Start by launching the Ben...") |
|||
| (14 intermediate revisions by the same user not shown) | |||
| Line 1: | Line 1: | ||
| − | + | '''This tutorial will show how to add cuts to tubes in an assembly project.''' | |
| + | |||
| + | '''(Note) Inches are used as the measurement units throughout this tutorial.''' | ||
__NOTOC__ | __NOTOC__ | ||
| − | |||
[[File:cut_tut_01.png|right|500px]] | [[File:cut_tut_01.png|right|500px]] | ||
| − | + | ==Things To Know== | |
| − | + | *"''This tutorial is designed to walk the user through creating an assembly design and cutting parts to fit together. As you go through this tutorial, later procedures will assume that you understand all earlier procedures. Because of this, it is very important that you carefully step through this guide, understanding everything along the way and following all steps in order.''" | |
| − | + | *"'''A few key items need to be addressed before starting the step-by-step instructions of this tutorial. It is very important for Bend-Tech users to completely understand these items:'''" | |
| − | + | ;1) [[PickPoints]] | |
| + | :PICKPOINTS ARE USED FOR EVERYTHING. The Assembly part of the software is largely run in full 3D. Because a computer screen is only 2D, there is an unlimited amount of depth behind and in front of the cursor. A PickPoint is a point in 3D space that can be used for creating, editing, and placing parts in handrail design. PickPoints can be placed in a 2D environment by having their depth manually entered in the appropriate value fields. | ||
| − | + | :*There are 2 types of PickPoints; Those automatically created by the part by default (various colors) and user-defined points (green). In addition, the initial (0,0,0) point is an automatic point that resides at the center of the Tri-Star. The Tri-Star is our directional definition locator. | |
| + | ;2) Center Line & Apex | ||
| + | :*Center Line: In the assembly design environment we are not working ''exclusively'' with the "'''center-line'''" of a part, but rather more with the inside or outside. | ||
| + | :*Apex: Most bend locations are created in handrail design with the "'''Apex'''". Our definition of apex is the intersection of the straight tubes as if there wasn’t a radius. | ||
| + | :This is demonstrated in the picture below. | ||
| + | [[File:W5.PNG]] | ||
| + | ;3) Locational Orientation | ||
| + | :*Designing seems to work the best if users imagine as if they are standing at a 45 degree angle to the desired creation. This way left is left and right is right. Take a minute and examine the Tri-Star (under the [[PickPoints]]] tab) to get your orientation. | ||
| + | ==Start Up== | ||
| + | 1) Start by double clicking the "'''Bend-Tech 7x'''" icon to start up the program.[[File:Bend_tech_icon.png]][[File:Material_Die.png|right]] | ||
| + | 2) Select the "'''Assembly'''" icon [[File:newassembly.png]] in the [[Task Menu]] under the "'''Create New'''" section to open the Assembly interface. The window that opens should be labeled [Assembly - 1]. | ||
| + | 3) For the purposes of this tutorial, click the "'''Maximize'''" button [[File:Min_Max_Close_Tab.png]] at the top right of the Assembly window. | ||
| + | 4) Also, for the purposes of this tutorial, zoom out significantly by spinning the wheel on your mouse so that the Tri-star is about the size of a pea in the lower left corner of the display area. | ||
| + | 5) For the purposes of this tutorial. The "'''Die & Material'''" tab is located in the upper left corner of the window. Select the "'''1.00 Material'''" and "'''2.0 Die'''" as seen here. | ||
| + | ==Part Design== | ||
| + | 1. | ||
| + | [[File:cut_tut_02.png|right|300px]] | ||
| + | *Before starting, we need to put a few parts together so that we have something to cut. | ||
| − | |||
| − | |||
| − | |||
| − | |||
| − | |||
| − | |||
| − | |||
| − | |||
| − | |||
| − | |||
| − | |||
| − | |||
| Line 47: | Line 54: | ||
| + | *Select the "'''PickPoints'''" tab and the "'''Single'''" sub-tab. | ||
| Line 59: | Line 67: | ||
| + | 2. | ||
| + | [[File:cut_tut_03.png|right|700px]] | ||
| + | *Select the "'''Set Reference'''" [[File:set_reference.png]] button and click the point at the center of the Tri-Star in the display area (this should be the only point on the display area right now). If you successfully select the point, it will turn red. | ||
| − | |||
| − | |||
| − | |||
| − | |||
| + | *Type the number '''24''' into the light green "'''Right'''" value field, then select the "'''Apply'''" [[File:apply.png]] button. | ||
| Line 77: | Line 85: | ||
| − | + | 3. | |
| − | |||
[[File:cut_tut_04.png|right|700px]] | [[File:cut_tut_04.png|right|700px]] | ||
| − | + | *Select the "'''Clear Values'''" button. | |
| − | |||
| Line 89: | Line 95: | ||
| + | *Type "'''12'''" into the light green "'''Right'''" value field and select the "'''Apply'''" [[File:apply.png]] button. | ||
| Line 97: | Line 104: | ||
| − | + | 4. | |
| − | |||
| − | |||
| − | |||
[[File:cut_tut_05.png|right|700px]] | [[File:cut_tut_05.png|right|700px]] | ||
| + | *Leave "'''12'''" in the light green "'''Right'''" value field and type "'''8'''" in the darker blue "'''Front'''" value field. | ||
| − | |||
| − | |||
| − | |||
| − | |||
| − | |||
| − | |||
| Line 114: | Line 113: | ||
| + | *Select the '''Apply''' [[File:apply.png]] button. | ||
| Line 121: | Line 121: | ||
| − | + | 5. | |
| − | |||
| − | |||
[[File:cut_tut_06.png|right|700px]] | [[File:cut_tut_06.png|right|700px]] | ||
| − | + | *Select the "'''Clear Values'''" button. | |
| − | |||
| − | |||
| − | |||
| − | |||
| − | |||
| − | |||
| − | |||
| − | |||
| Line 140: | Line 130: | ||
| + | *Type "'''12'''" in the darker blue "'''Front'''" value field, also type "'''12''''" in the light green "'''Right'''" value field, then select '''Apply''' [[File:apply.png]]. | ||
| − | |||
| − | |||
| − | |||
| − | + | 6. | |
| − | |||
| − | |||
| − | |||
| − | |||
| − | |||
| − | |||
| − | |||
| − | |||
| − | |||
| − | |||
| − | |||
| − | |||
| − | |||
| − | |||
| − | |||
[[File:cut_tut_08.png|right|540px]] | [[File:cut_tut_08.png|right|540px]] | ||
| − | + | *Select the '''Straight Part''' [[File:Straight_part1.png]] button. | |
| − | |||
| − | |||
| − | |||
| − | |||
| + | *'''Connect the two points''' that are indicated in the picture to the right. | ||
| − | + | 7. | |
| − | |||
| − | |||
| − | |||
[[File:cut_tut_09.png|right]] | [[File:cut_tut_09.png|right]] | ||
| + | *'''Connect the two points''' that are indicated in the picture to the right. | ||
| − | |||
| Line 195: | Line 162: | ||
| − | + | 8. | |
| − | |||
| − | |||
| − | |||
| − | |||
| − | |||
| − | |||
| − | |||
| − | |||
[[File:cut_tut_10.png|right|540px]] | [[File:cut_tut_10.png|right|540px]] | ||
| + | *'''Connect the two points''' that are indicated in the picture to the right. | ||
| + | '''You are now finished building the part.''' | ||
| − | |||
| − | |||
| Line 216: | Line 175: | ||
| − | + | ==Cutting== | |
| − | + | 1. | |
| − | |||
| − | |||
| − | |||
| − | |||
[[File:cut_tut_11.png|left|250px]] | [[File:cut_tut_11.png|left|250px]] | ||
| − | + | *Select the '''Cutting''' tab. | |
| − | |||
| Line 253: | Line 207: | ||
| − | + | 2. | |
| − | |||
[[File:cut_tut_12.png|right]] | [[File:cut_tut_12.png|right]] | ||
| + | *Select the "'''New Cut'''" [[File:new_cut.png]] button. | ||
| − | |||
| + | *Next, select the '''Left''' tube in the display area. This will be the tube that is cut (highlighted green). Now, select the middle tube. This tube will define how the first tube is cut (red tube). | ||
| − | |||
| + | *Select the "'''Complete'''" [[File:complete.png]] button. | ||
| − | |||
| Line 271: | Line 224: | ||
| − | + | 3. | |
| − | |||
| − | |||
| − | |||
| − | |||
[[File:cut_tut_13.png|right|700px]] | [[File:cut_tut_13.png|right|700px]] | ||
| − | The cut will | + | *The cut will be added to the '''Cut List'''. |
| − | Zoom in on the part model to see a better view of the cut outline. The cutting profile will be represented by the blue and black lines. | + | *Zoom in on the part model to see a better view of the cut outline. The cutting profile will be represented by the blue and black lines. |
| Line 288: | Line 237: | ||
| − | + | 4. | |
[[File:cut_tut_14.png|right]] | [[File:cut_tut_14.png|right]] | ||
| − | + | *Select the "'''New Cut'''" [[File:new_cut.png]] button, again. | |
| − | |||
| − | |||
| − | |||
| − | |||
| − | |||
| + | *Select the right tube, followed by the middle tube to define a second cut. | ||
| + | *Select the "'''Complete'''" [[File:complete.png]] button. | ||
| Line 307: | Line 253: | ||
| − | + | 5. | |
[[File:cut_tut_15.png|right|700px]] | [[File:cut_tut_15.png|right|700px]] | ||
| − | The second cut will then be added to the ''' | + | *The second cut will then be added to the '''Cut List'''. |
| − | |||
| − | |||
| + | *Again, zoom in on the part model to see a better view of the cut outline. The cutting profile will be represented by the blue and black lines. | ||
| Line 324: | Line 269: | ||
| − | + | 6. | |
[[File:cut_tut_16.png|right|500px]] | [[File:cut_tut_16.png|right|500px]] | ||
| − | You are now finished adding cuts to the part. | + | '''You are now finished adding cuts to the part.''' |
| − | To see a preview of the cutting wrapper (shown to the right), | + | *To see a preview of the cutting wrapper (shown to the right), select the "'''Details'''" [[File:details.png]] below the Cut List. |
| − | + | *Printing out cutting sleeves for both cuts can be done by selecting the "'''Print All'''" [[File:print_all_cuts.png]] button below the '''Cut List'''. | |
Latest revision as of 08:53, 22 September 2014
This tutorial will show how to add cuts to tubes in an assembly project.
(Note) Inches are used as the measurement units throughout this tutorial.
Things To Know
- "This tutorial is designed to walk the user through creating an assembly design and cutting parts to fit together. As you go through this tutorial, later procedures will assume that you understand all earlier procedures. Because of this, it is very important that you carefully step through this guide, understanding everything along the way and following all steps in order."
- "A few key items need to be addressed before starting the step-by-step instructions of this tutorial. It is very important for Bend-Tech users to completely understand these items:"
- 1) PickPoints
- PICKPOINTS ARE USED FOR EVERYTHING. The Assembly part of the software is largely run in full 3D. Because a computer screen is only 2D, there is an unlimited amount of depth behind and in front of the cursor. A PickPoint is a point in 3D space that can be used for creating, editing, and placing parts in handrail design. PickPoints can be placed in a 2D environment by having their depth manually entered in the appropriate value fields.
- There are 2 types of PickPoints; Those automatically created by the part by default (various colors) and user-defined points (green). In addition, the initial (0,0,0) point is an automatic point that resides at the center of the Tri-Star. The Tri-Star is our directional definition locator.
- 2) Center Line & Apex
-
- Center Line: In the assembly design environment we are not working exclusively with the "center-line" of a part, but rather more with the inside or outside.
- Apex: Most bend locations are created in handrail design with the "Apex". Our definition of apex is the intersection of the straight tubes as if there wasn’t a radius.
- This is demonstrated in the picture below.
- 3) Locational Orientation
-
- Designing seems to work the best if users imagine as if they are standing at a 45 degree angle to the desired creation. This way left is left and right is right. Take a minute and examine the Tri-Star (under the PickPoints] tab) to get your orientation.
Start Up
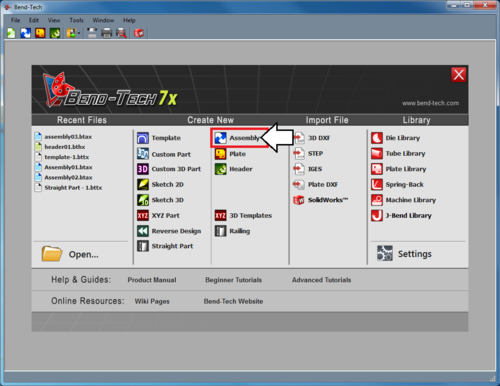
1) Start by double clicking the "Bend-Tech 7x" icon to start up the program.2) Select the "Assembly" icon ![]() in the Task Menu under the "Create New" section to open the Assembly interface. The window that opens should be labeled [Assembly - 1].
in the Task Menu under the "Create New" section to open the Assembly interface. The window that opens should be labeled [Assembly - 1].
3) For the purposes of this tutorial, click the "Maximize" button ![]() at the top right of the Assembly window.
at the top right of the Assembly window.
4) Also, for the purposes of this tutorial, zoom out significantly by spinning the wheel on your mouse so that the Tri-star is about the size of a pea in the lower left corner of the display area.
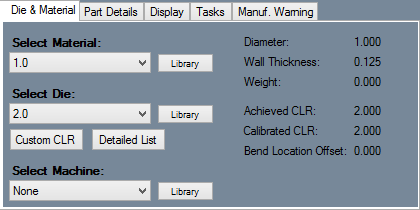
5) For the purposes of this tutorial. The "Die & Material" tab is located in the upper left corner of the window. Select the "1.00 Material" and "2.0 Die" as seen here.
Part Design
1.
- Before starting, we need to put a few parts together so that we have something to cut.
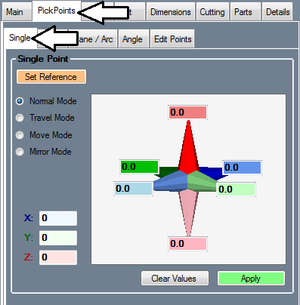
- Select the "PickPoints" tab and the "Single" sub-tab.
2.
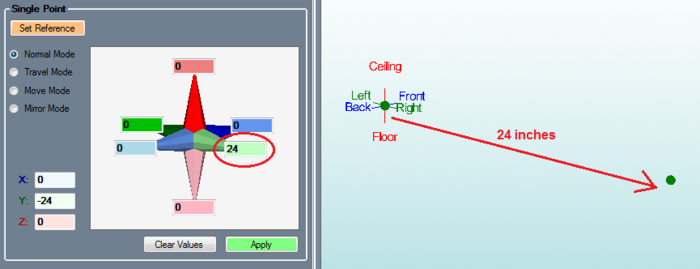
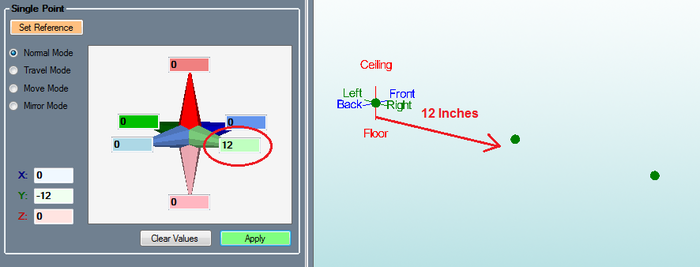
- Select the "Set Reference"
 button and click the point at the center of the Tri-Star in the display area (this should be the only point on the display area right now). If you successfully select the point, it will turn red.
3.
- Select the "Clear Values" button.
4.
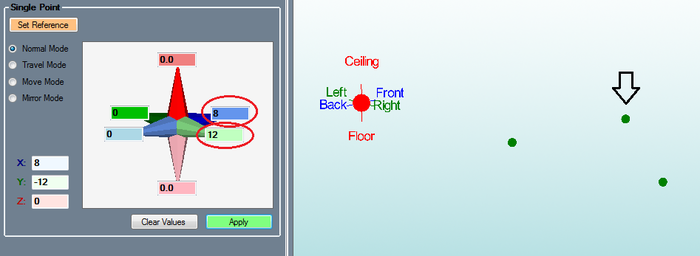
- Leave "12" in the light green "Right" value field and type "8" in the darker blue "Front" value field.
5.
- Select the "Clear Values" button.
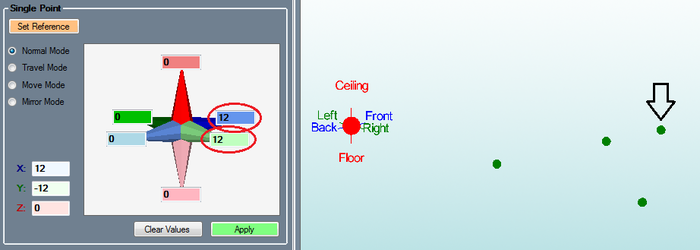
- Type "12" in the darker blue "Front" value field, also type "12'" in the light green "Right" value field, then select Apply
 .
.
6.
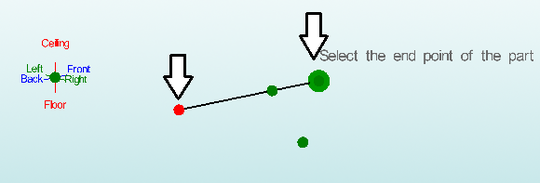
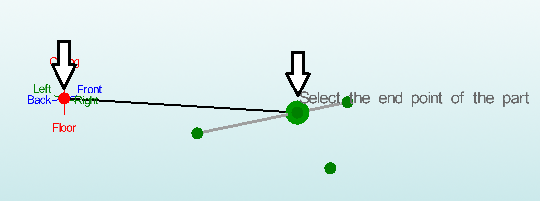
- Connect the two points that are indicated in the picture to the right.
7.
- Connect the two points that are indicated in the picture to the right.
8.
- Connect the two points that are indicated in the picture to the right.
You are now finished building the part.
Cutting
1.
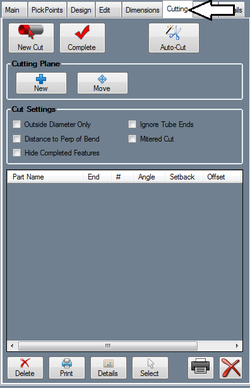
- Select the Cutting tab.
2.
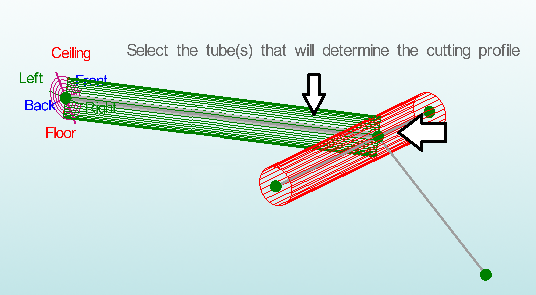
- Next, select the Left tube in the display area. This will be the tube that is cut (highlighted green). Now, select the middle tube. This tube will define how the first tube is cut (red tube).
3.
- The cut will be added to the Cut List.
- Zoom in on the part model to see a better view of the cut outline. The cutting profile will be represented by the blue and black lines.
4.
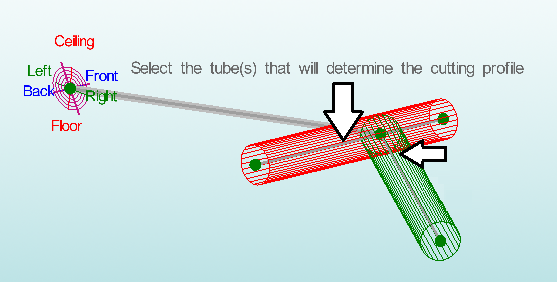
- Select the right tube, followed by the middle tube to define a second cut.
5.
- The second cut will then be added to the Cut List.
- Again, zoom in on the part model to see a better view of the cut outline. The cutting profile will be represented by the blue and black lines.
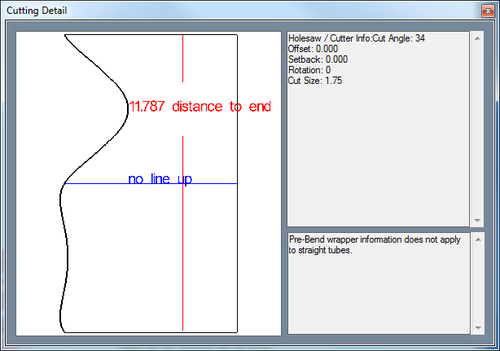
6.
You are now finished adding cuts to the part.
