OEM Die List
OEM List
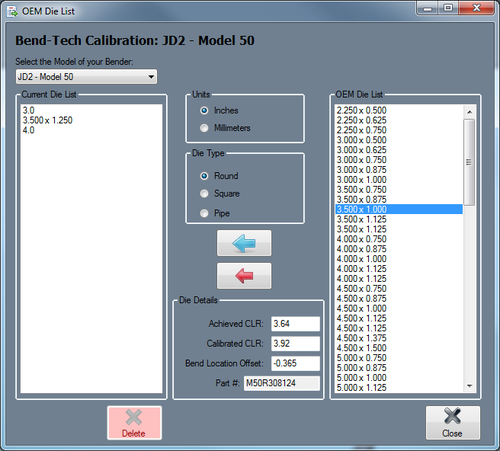
First click the OEM List button. ![]() This will open up a new window (seen to the right) where dies for specific machine makes and models can be searched for and added to the die library.
This will open up a new window (seen to the right) where dies for specific machine makes and models can be searched for and added to the die library.
A list of all the dies currently in the library will be shown on the left side of the window. In the middle there will be a machine/bend drop down menu and a selection menu where the material shape and measurement can be chosen. Below the menus, the die information will be shown once a die is selected from the right die list. To the far right, a list of available dies for the machine and material will be shown once a machine is selected.
The die shape and unit of measure of the dies shown in the OEM list can be adjusted using the Units and Die Type menus.
To add a single die from the OEM list, select a machine from the machine drop down menu and specify the units and die type. Once this is done, a list of dies for the current machine will be generated in the list to right. Click the upper Add button and the die will be brought into the die library. You will be given the option to change the name of this die, otherwise the name used to identify it in the OEM list will be used (this can be edited later on as well). Click the OK button to finalize the add.
To add multiple dies from the OEM list, select a machine from the drop down menu and specify the units and die type. Once this is done, a list of dies for the current machine will be generated in the OEM die list to right. Click the lower Add button to add every die shown in the OEM die list to the die library. All of the dies will keep their original names initially, but can be edited once added to the die library
To view the die's attribute information, click on it to select it. The die details will be generated in the Die Details section between the die lists.
