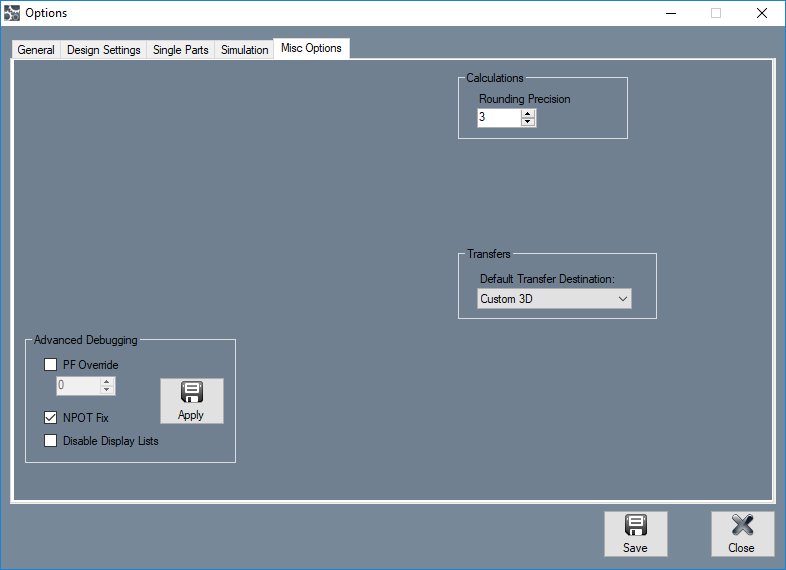
EZ-3D Options
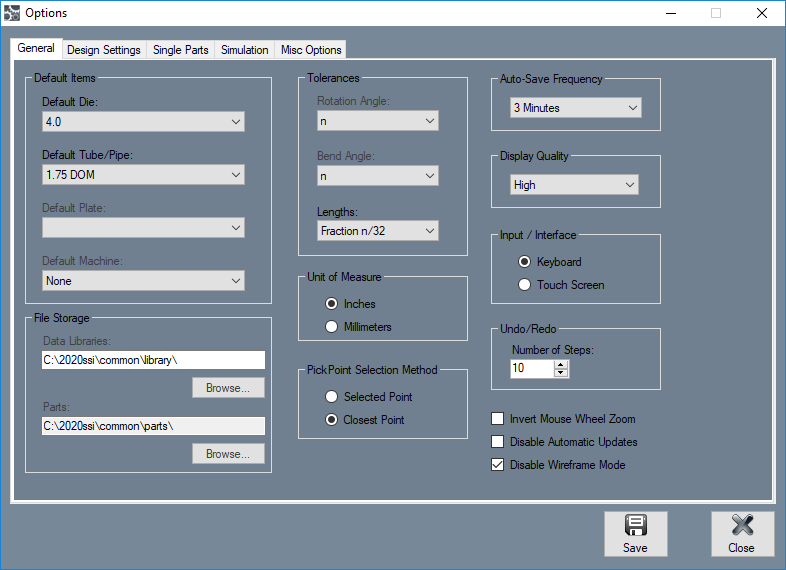
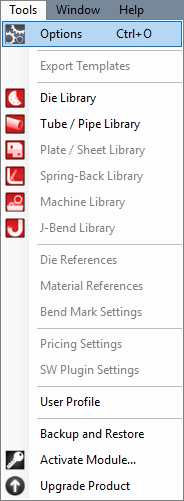
This menu can be accessed by clicking the Tools option on the EZ Main Menu Bar and selecting Options from the drop down menu.
Additionally, when adjusting any of these settings, be sure to click the Save button ![]() at the bottom of the frame to apply the new defaults or settings. When any default settings are changed, any designs that are currently open will not be affected. Any new designs or designs opened after changes were made will have these settings applied.
at the bottom of the frame to apply the new defaults or settings. When any default settings are changed, any designs that are currently open will not be affected. Any new designs or designs opened after changes were made will have these settings applied.
To access the options menu, click on the Tools menu on the EZ Main Menu Bar and select Options in the drop down menu
...or click on the Settings link on the Task Menu.
...or click Ctrl + O on your keyboard.
General Tab
Default Items
- Default Die: In the Default Die menu, a die can be chosen and set as the default. Once a die is set as the default, it will be the die that is initially selected when a new single part is created. To set a default die, click the drop down menu and select a die from the list.
- Default Tube/Pipe: In the Default Tube/Pipe menu, a tube/pipe material can be chosen and set as the default. Once a material is set as the default, it will be the material that is initially selected when a new single part is created.
- Default Plate: Not available in EZ-3D.
- Default Machine: Not available in EZ-3D.
File Storage
The file storage locations will determine where data (die, material, plate, etc.) libraries and part files will be stored.
- Data Libraries: To choose a new location for the data libraries, click the "Browse"..." button
 below the data libraries location.
- Part: To choose a default location for part files, click the "Browse:..." button
 below the parts location. This will be the folder that is initially opened when a part is being saved.
- "It is recommended that you stick with the default file locations for the part and data libraries. It will be easier for our company to find them if there is ever a problem with your computer which affects the software."
Tolerances
The decimal tolerance for the lengths can be adjusted here. The decimal tolerance controls how many digits will be allowed after decimals points for lengths of tube, or overall dimensions. In the tolerance options, each digit place is represented by an n.
(For example, if the length tolerance is set to n.nn and the actual length is 90.539, the length will be rounded to 90.54. If the length tolerance is set to just n, then the length would be rounded to 91.)
- Rotation Angle: Not available in EZ-3D.
- Bend Angle: Not available in EZ-3D.
- Lengths: Length values can be displayed in either fractional or decimal format. To change the format and/or tolerance for lengths, click the drop down menu and select an option from the list.
Unit of Measure
- The measurement units can be set to either "Inches:" or "Millimeters:". Once a unit of measure is chosen, it will be the unit of measure that is initially chosen wherever units of measure can be adjusted throughout the software.
PickPoint Selection Method
- The "PickPoint Selection Method:" will determine how pickpoints can be selected in the plate and assembly interfaces. The "Selected Point:" option will require a point to be directly clicked on in order to be selected. The "Closest Point:" option will select whichever point is closest to the cursor when it is clicked.
Auto-Save Frequency
- Using the "Auto-Save Frequency:" drop down menu, the time interval between auto-saves can be adjusted or the function can be turned off. This setting will affect any open designs throughout the software.
Display Quality
- Using the "Display Quality:" drop down menu, the quality of the graphical representation of parts, plate designs, or assemblies can be adjusted. To change this setting, click on the drop down menu and choose either Low, Medium, or High.
Input/Interface
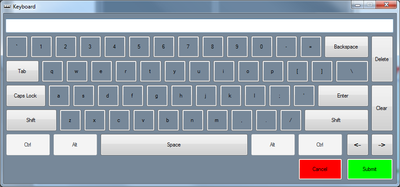
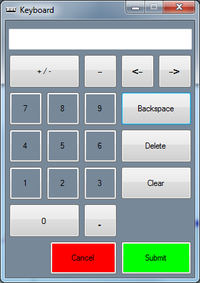
- The type of input device used with the software can be specified here. For a standard computer and keyboard setup, the "Keyboard:" option would be appropriate. If a touchscreen computer/computer without a keyboard, select the "Touch Screen:" option. When this option is chosen, a keyboard/number pad will open on-screen whenever text or a numerical value is needed to be entered. (See the images below.)
Undo/Redo
- The number of steps allowed for redo/undos can be adjusted here. For example, if 10 is set as the number of steps, the undo button can be hit 10 times before it no longer has an affect on the plate or assembly design. There is a limit to 100 steps.
Invert Mouse Wheel Zoom
- Check the "Invert Mouse Wheel Zoom:" checkbox to reverse the zoom direction from the default (scrolling up to zoom out and scrolling down to zoom in) to the inverted setting (scrolling up to zoom in and scrolling down to zoom out).
Disable Automatic Updates
- When the "Disable Automatic Updates:" checkbox is clicked, automatic software updates will be disabled.
Disable Wireframe Mode
- When the "Disable Wireframe:" checkbox is clicked, wireframe mode will not be available.
Design Settings
Rotation
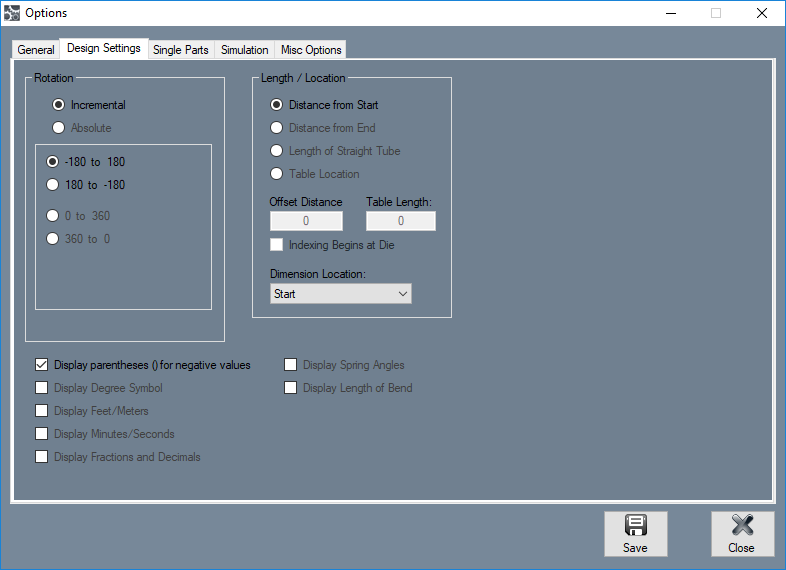
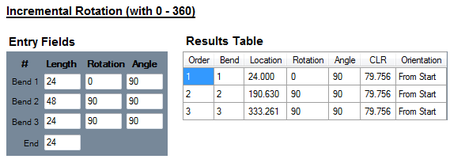
The rotation settings control how rotation values are displayed in the results table. Rotation can be measured in incremental or absolute terms. Each rotation angle range can also be chosen.
- Incremental: Select the "Incremental:" option and rotation angles will start from the end of the previous bend's rotation.
- Absolute: Not available in EZ-3D.
- Angle Scale: The rotation scale will determine what the rotation angles will range between. The rotation scale will show where the angle measurements begin and where they end. Choose a rotation scale by clicking on one of the scale options. The rotation scales available are (-180) - 180, and 180 - (-180).
Display Settings
In the bottom left corner there will be a list of checkbox options to control the display options for the results table on single part designers.
- Display parentheses () for negative values: Check this box to have all negative values enclosed in parentheses.
- Display Degree Symbol: Not available in EZ-3D.
- Display Feet/Meters: Not available in EZ-3D.
- Display Minutes/Seconds: Not available in EZ-3D.
- Display Fractions and Decimals: Not available in EZ-3D.
- Display Spring Angles: Not available in EZ-3D.
- Display Length of Bend: Not available in EZ-3D.
Length/Location
The length/location setting will determine how the bend location will be calculated in the results table.
- Distance from Start: Bend locations will be measured from the starting edge of the tube.
- Distance from End: Not available in EZ-3D.
- Length of Straight Tube: Not available in EZ-3D.
- Table Location: Not available in EZ-3D.
- Dimension Location: This option determines where the bend location marks will be placed in reference to the bend. Bend locations can be placed at the start, center, or end of each bend.
Single Parts
Features to Display
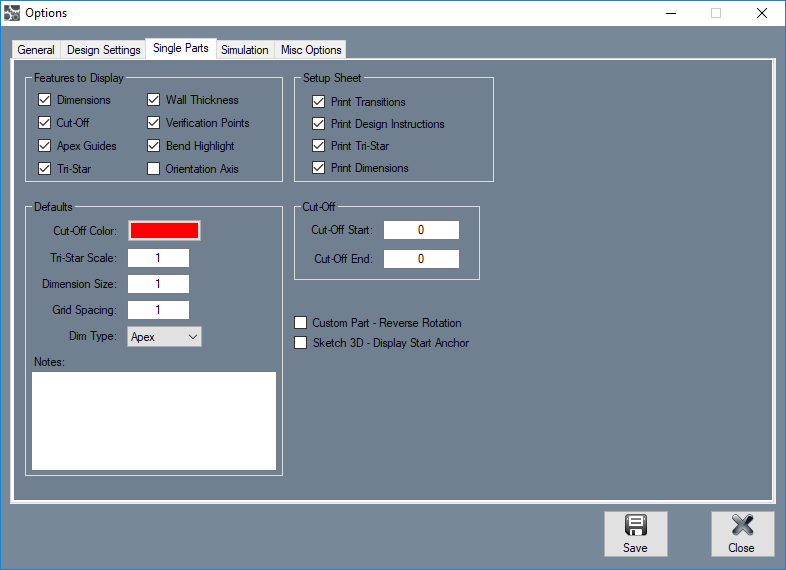
These settings will determine the kind of features that will be displayed on the part model in any of the single part design interfaces. Click the check boxes next to the features you want to have shown.
- Dimensions: Length measurement values will be displayed on the part lengths.
- Cut-Off: If any cut-off is added to the part, it will be represented on the part display.
- Apex Guides: For each bend, guidelines will extend from the part model to the verification points.
- Tri-Star: The axis will be shown on the graphical display.
- Wall Thickness: The thickness of the material will be shown on the 3D part model.
- Verification Points: Points will be displayed at the apex of each bend.
- Bend Highlight: The current bend will be highlighted in red on the 3D part model.
- Orientation Axis: The orientation axis will be displayed in the bottom left corner of the part display.
Defaults
- Cut-Off Color: This will be the default color that will be used to represent the sections of cut-off on the 3D part model.
- Tri-Star Scale: The default scaling value for the axis.
- Dimension Size: The default dimension size.
- Dim Type: The default dimension type that will be selected in the Dim Type menus for each bend.
- Notes: The default notes that will be generated in the notes area for new part designs.
Setup Sheet
- Print Transitions: The transition sheet will include a chart that displays the location, rotation, and bend angle values for each bend on the part. Each location, rotation, and angle will have a image of the 3D part showing what the part will look like at that specific stage. By default, these instructions will be included on the print out while this option is checked.
- Print Design Instructions: By default, the design instructions chart will be included on the print out while this option is checked.
- Print Tri-Star: By default, the part model will have the tri-star included on the print out while this option is checked.
- Print Dimensions: By default, the part model will have the dimension markers and values included while this option is checked.
Cut-Off
- The default cut-off start and end values can be defined here. Each new part will automatically have these cut-offs initially applied.
Custom Part - Reverse Rotation
- Check this box to reverse the rotation direction while using the Custom Part design interface.
Sketch 3D - Display Start Anchor
- Check this box to display the start anchor for all Sketch 3D design files.
Simulation
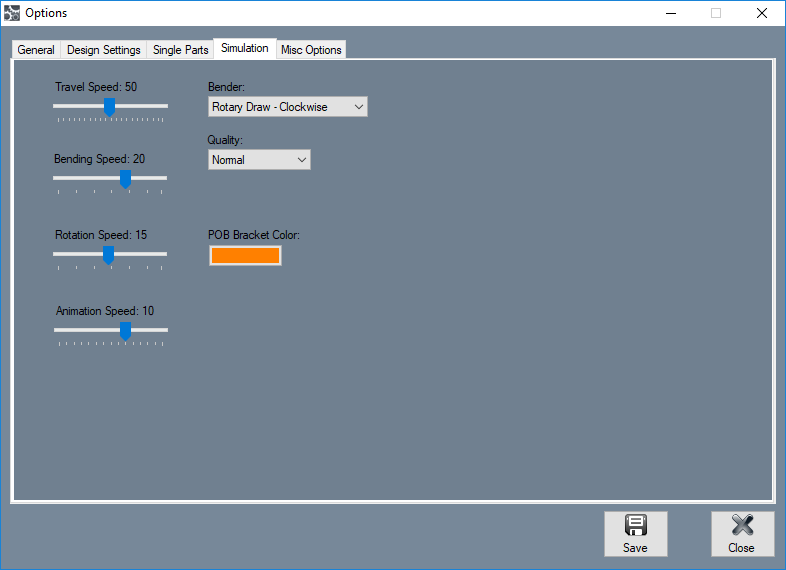
In the Simulation tab, the default travel, bend, rotation, and animation speed, as well as the default bender type, simulation quality and POB bracket color can be set. These settings are only defaults and can be adjusted while viewing the simulation.
Speeds
- The default speeds of the travel, bending, rotation, and animation can be adjusted independently. To adjust the speeds, click and drag the point back and forth.
Bender
- The bender chosen here will determine the type of bender used in simulation. The bender options available are: center compression, rotary compression - clockwise, rotary compression - counter clockwise, rotary compression - vertical, rotary draw - clockwise, rotary draw - counter clockwise, and rotary draw - vertical.
Quality
- The display quality of the simulation animation can be adjusted here. To adjust the simulation, click on the drop down menu and choose a quality option.
POB Bracket Color
- The default color of the POB bracket shown in the simulation can be determined here. To change the color, click on the button and select a color.
Misc Options
Calculations
- The decimal rounding precision can be specified in the Rounding Precision field. This precision value will be used to determine how many decimal places to round converted values (when using the Inch vs MM function, for example).
